Be fora staring up, read this manual carefully and keep it for future reference. INVERTER SPLIT-TYPE ROOM AIR CONDITIONER HEAT PUMP Installation Manual Y cooler COMFORT MADE SIMPLE PREMIER Please read this installation mi rival completely before installing the product. “if the power cord is damaged, replacement work shall be performed by authorized personnel only. “installation work must be: performed in accordance with the national wiring Standards: by authorized personnel ably.
CONTENTS SAFETY PRECAUTIONS Warning Caution .. INSTALLATION INSTRUCTIONS Selecting installation site Accessorizes wim indoor & outdoor unit installation drawings . INDOOR UNIT INSTALLATION installation plate mounting Drilling a Hole in the wall Cable connection...
SAFETY PRECAUTIONS ® Read the follow SAFETY PRECAUTIONS carefully before installation. ® in seriousness is classified by the following indications, 28 correct installation due to ignoring of the instruction-will cause han damages, and the JN WARNING | This symbol indicates the possibility of death of devious injury. § A CAUTION Embellish indicates the possibility of injury or damage to property. Q This symbol indicates items that are PROHIBITED from doing.
INSTALLATION INSTRUCTIONS Selecting installation site Read completely, then follow step by steps Indoor unit ® Troubleshooter be.any heat source, inflammable gas or stream near the unit. ® Troubleshooting be any Obstacles blocking air circulation. 8 fop lace where circulation in the room dissolved: # A place where drainage cane easily done. aA place where noise prevention fs taken into consideration.
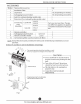
Connective installation 1. Far the deft-hand and right-hand piping, remove the pipe cover from the side panel, 2 For the right back and left back piping, install the piping as shown. Moss and tape the drain hose with 1.8 POS os mentioned in Fig. Below. INDOOR UNIT INSTALLATION Covertness — R NOTE: For 9K/12K model, there is-only one right piping side drainage structure design. For 18k/24K model one side drainage structure is standard.
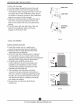
OUTDOOR UNIT INSTALLATION mountaineering 1. Pass the piping tire ugh the hole in the wall. 2. HOOK hedonist unit ante the upper parson af installation plate engage the indoor whit with the upper edge of the installation plate). Ensure pothooks are properly seated on the installation plate by moving indentation right. 3. Piping carveasilybemade by lifting the indoor unit with & cushioning material between the indoor unit and the wall, Gerontological finish piping: 4.
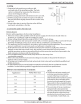
OUTDOOR UNIT INSTALLATION B: Burr removal 1. Completely remove all burrs from: the cut cross section of pipette 2. Hold the end of the copper tailpipe Ina downward direction as you remove burrs in order (o-avoid dipping Burs into the tub. ©: Putting nut 'on Rena fad nuts attached to indoor and suburbanite then pat them an pipe/tube having completed bur overemotional possible few-put them on-after flaring work) 3: Flaring work Fiery hld copper pipe ina digit the dimension shown in the tablecloth. Cuter diam.
TEST RUNNING Safety and leakage k B® Electrical safety cheek Perform the electric safe check after completing installation: grounding work After finishing grounding work, measure the grounding resistance by visual detection and grounding resistance ester Make sure the grounding resistance lengthiness da. 2.
AT Y cooler COMFORT MADE SIMPLE PREMIER Product design-and specifications are subject to change without prior notification. seller or the product manufacturer for additional details.