
Installation Guide


Page 17 mrcool.com
Unit Installation
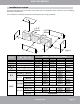
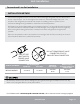
Flare nut
Copper pipe
Fig. 2.11
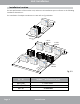
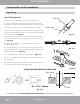
Fig. 2.12
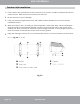
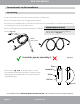
Fig. 2.14
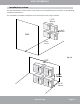
PIPING EXTENSION BEYOND FLARE FORM
Flare form
Pipe
A
A = ~1/16” (1.6mm)
Fig. 2.13
Step 3: Flare pipe ends
Proper flaring is essential to achieve an airtight seal.
1. After removing burrs from cut pipe, seal the ends with
PVC tape to prevent foreign materials from entering the pipe.
2. Sheath the pipe with insulating material as necessary
3. Remove the cut-off valve of outdoor unit and take out the
flare nut from the bag of indoor unit accessories. Fit the flare
nut on the pipe - see Fig 2.11.
4. Make sure it is facing in the right direction, because you
can not remove the nut or change its direction after flaring.
See Fig. 2.12.
5. Remove PVC tape from ends of pipe when ready to
perform flaring work.
6. Clamp flare form on the end of the pipe. The end of the
pipe should extend ~ 1/16” (1.6mm) beyond the edge of the
flare form as shown in Fig. 2.13
7. Place flaring tool onto the form.as shown in Fig. 2.14
8
. Turn the handle of the flaring tool clockwise until the pipe
is fully flared.
9. Remove the flaring tool and flare form, then inspect the
end of the pipe for cracks and even flaring.
Conventional Line Set Installation
Pipe Flaring
For installation with a No-Vac® Quick Connect® Line Set, refer to the next section starting on page 23