
mrcool 13seer r410 cond install manual 4web

Unitary Ducted Split AC & HP
13
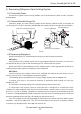
Perform the following task:
a. Start the existing HCFC−410A system in the cooling mode and close the liquid line valve.
b. Use the compressor to pump as much of the existing HCFC−410A refrigerant into the
outdoor unit until the outdoor system is full. Turn the outdoor unit main power OFF and use
a recovery machine to remove the remaining refrigerant from the system.
NOTE: It may be necessary to bypass the low pressure switches (if equipped) to ensure
complete refrigerant evacuation.
c. When the low side system pressures reach 0 psig, close the vapor line valve.
d. Check gauges after shutdown to conrm that the valves are not allowing refrigerant to ow
back into the low side of the system.
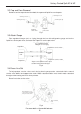
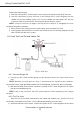
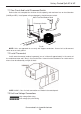
6.4 Leak Test Line Set and Indoor Coil
Fig.14—Leak Test
6.4.1 Connect Gauge Set
1). Connect an HFC−410A manifold gauge set high pressure hose to the vapor valve service
port.
NOTE: Normally, the high pressure hose is connected to the liquid line port. However,
connecting it to the vapor port better protects the manifold gauge set from high pressure damage.
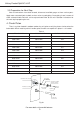
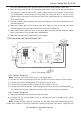
2). With both manifold valves closed, connect the cylinder of HFC−410A refrigerant to the center
port of the manifold gauge set.
NOTE: Later in the procedure, the HFC−410A container will be replaced by the nitrogen
container.
6.4.2 Test For Leaks
After the line set has been connected to the indoor and outdoor units, check the line set
connections and indoor unit for leaks. Use the following procedure to test for leaks:
1). With both manifold valves closed, connect the cylinder of HFC−410A refrigerant to the center
For more details visit www.MrCool.com