
Instructions / Assembly


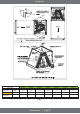

•Using a screwdriver, lift the blue plastic tab with hole away from breaker until breaker releases from
mounting opening.
•With breaker held in hand, rotate breaker so that the ”on” position is up, and ”off” position is down (with
unit in planned vertical mounting position). Insert right wire bundle into top right breaker lug, ensuring all
strands of all the wires are inserted fully into lug, and no wire insulation is in the lug.
•Tighten lug as tight as possible while holding circuit breaker. Check wires and make sure each wire is
secure and none are loose. Repeat for left wire bundle in left top circuit breaker lug.
•Replace breaker by inserting the breaker mounting tab, opposite of the white pull tab in opening, hook
mounting tab over edge in opening.
•Using a screwdriver, pull the blue tab with hole away from breaker while setting that side of breaker into
the the opening. When breaker is in place, release tab, which will lock circuit breaker into location in
opening.
•Repeat above operation for remaining breaker(s) (if more than one is provided).
•Replace single point wiring jumper bar, if it is used, on line side of breaker and tighten securely.
•Double check wires and lugs to make sure all are secure and tight. Check to make sure unit wiring to
circuit breaker load lugs match that shown on the unit wiring diagram.
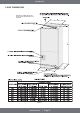
INDOOR UNIT
mrcool.com | Page 7
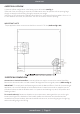
When using the unit with the electrical heater, the switch on the
front of the panel is only used for the electrical heater.
Horizontal right is the default factory configuration for the units.
Conversion to Horizontal: A vertical upflow unit may be converted to horizontal left by removing indoor
coil assembly and reinstalling coil as shown for left hand air supply. And reinstall coil in unit as shown for
left hand air supply.
•Rotate unit into the downflow position, with the coil compartment on top and the blower compartment
on bottom (Refer to Fig. 3).
•Reinstall the indoor coil 180° from the original position. Ensure the retaining channel is fully engaged with
the coil rail (Refer to Fig. 3).
•Secondary drain pan kits are recommended when the unit is configured for the horizontal position over a
finished ceiling and/or living space.
Horizontal units must be configured for right hand air supply or
left hand air supply. Horizontal drain pan must be located under
indoor coil. Failure to use the drain pan can result in property
damage.
Conversion in Horizontal Direction: Horizontal right-hand supply can be changed to horizontal left-hand
supply by removing the indoor coil and reinstalling 180 ° from the original position.
6 HORIZONTAL