
Installation Guide


Page 22mrcool.com
Indoor Unit Installation
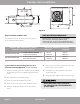
3. Using open ended wrenches (i.e. crescent or adjustable),
hold the points marked “1” and turn the nuts only at the
points marked “2” (select the appropriate wrench according
to the dimensions of the connector).
Outer Diameter
of Pipe (in/mm)
Stamp
Tightening Torque
(lb·ft / N·m)
Add. Tightening Torque
(lb·ft / N·m )
Ø0.25” (Ø 6.35mm)
1/4”
3/8”
1/2”
5/8”
11 lb•ft (14.91 N·m)
11.8lb•ft (16 N·m)
Ø0.375” (Ø 9.52mm)
18.4 lb•ft (24.95 N·m)
19.18lb•ft (26 N·m)
Ø0.5” (Ø12.7mm)
25.8 lb•ft (34.98 N·m)
26.55lb•ft (36 N·m)
Ø0.63” (Ø16mm) 33.19 lb•ft (45 N·m) 34.67lb•ft (47.01N·m)
TORQUE REQUIREMENTS
1. Excessive force can break the nut or damage the refrigerant piping. You must not exceed torque
requirements shown in the table below.
2. You can find the Outer Pipe Diameter stamped (in inches) on the valve set of the condenser.
Refer to this when finding and applying the torque values in the table below.
3. Note that there may be differences in Torque Wrenches (i.e. automotive torque wrench versus a
HVAC torque wrench) and that a socket style wrench cannot be used here.
4. Ensure that the screw connectors do not skew as you
tighten them and work quickly.
5. After finishing the connection, use the tape to wrap the
refrigerant pipe and connecting cable together.
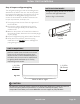
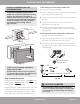
6. After you finish connecting the quick connectors, pass the
drain hose and refrigerant pipes through the wall hole as
shown here.
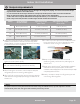
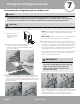
7 In order to prevent Quick Connect® parts from
being exposed to air, sound deadening pads
should be used during the installation.
8.Wrap the Quick Connect
®
with the sound
deadening pads, pack down the pads tightly as
shown here.
9. Wrap up the Quick Connect
®
with the black insulation
material. For the top exposed part, use the white
insulation material (supplied in Accessories box) to wrap
completely as shown here.
10. Lastly, use tape to wrap the refrigerant pipe and
connecting cable together.
IMPORTANT: Before you continue, it is essential
that you read the following instructions carefully.
The Quick Connect
®
must be placed outside of the room. Using the wall hole sleeve, cap and neoprene to seal the
wall hole. Both power cable and signal cable should be protected by conduit.
NOTE:
1 2