
Use and Care Manual


Page 36mrcool.com
Refrigerant Piping Connection
Make sure to arrange the drain hose correctly according
to Fig. 7.3a.
DO NOT kink the drain hose.
DO NOT create a water trap.
DO NOT put the end of the drain hose in water or a
container that will collect water.
ENSURE UNUSED DRAIN HOLE IS PLUGGED
As shown in Fig. 7.4, there are two drain
holes on the indoor unit: one on the left,
and one on the right. The unit arrives with
the drain hose connected to the left hole
and a hollow center rubber plug in the
right. Connect the drain hose to the drain
hole that best works for your installation
location. To prevent unwanted leaks, be
sure that the plug is installed in the unused
drain hole. The plug is depicted in the right
hole in the figure.
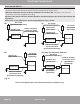
Fig. 7.3a
Fig. 7.3b
Fig. 7.3c
Fig. 7.3d
Make sure there are NO
kinks or dents in the
hose to ensure proper
drainage.
NOT CORRECT
DENTS in the drain hose
will create water traps.
NOT CORRECT
KINKS in the drain hose
will create water traps.
NOT CORRECT
DO NOT place the end
of the drain hose in
water or in containers
that collect water.
This will prevent
proper drainage.
In this step you will connect the drain hose extension to
the drain hose exiting from the indoor unit that is within
the piping bundle you wrapped in the previous steps.
1. Securely connect the drain hose extension to the
drain piping from the indoor unit.
2. Using example Fig. 6.3a as a guide, make sure your
drain pipe is run in a similar manner. The other
examples in Fig 6.3 represent things you should
avoid when installing your drain pipe.
3. Remove the air filter from the indoor unit and pour a
small amount of water across the coils to test the
drain pan. Ensure that the water exits the bottom of
the unit and flows through the drain and drain pipe
smoothly.
Step 7: Connect Drain Pipe
CAUTION
Fig. 7.4