
Installation Guide


Page 21 mrcool.com
Indoor Unit Installation
5.1 Tools Needed
You will require the following tools to carry out this
installation work correctly:
•1x crescent wrench, 19 mm
•1x crescent wrench, 22 mm/24mm
•1x crescent wrench, 24 mm/27mm
•1x Allen key, 5 mm
•1x Philips screwdriver
•1x leak detection spray or alternatively soap suds
(water/detergent mix)
5.2 Important Information
•Follow the detailed instructions for connecting the
refrigerant pipes to the indoor unit and outdoor unit.
We can only provide a warranty if the lines are
installed correctly as described in the instructions.
•If you are using a 24K Air Handler with a 4-zone
condenser, you will need to use the lineset adapter kit
that is included with the 4-zone condenser for that
lineset connection.
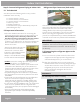
Step 5: Connect Refrigerant Piping to Indoor Unit Refrigerant Pipe Connectors (both ends):
If the screw connections are tightened with too little
torque, they will leak. If they are tightened with too
much torque, the screw connections may suffer
damage. Please refer to the torque requirements
section for more information. If you are not confident
about connecting the refrigerant line connectors
yourself, it is imperative that you contact the MRCOOL
®
customer service team or a professional for assistance.
IMPORTANT:
The EQ valves are only designed for one-time
installation. Their seal can not be guaranteed if they are
installed on more than one occasion. This will also void
the warranty.
5.3 Connecting the refrigerant pipes to the
indoor unit
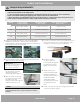
1.
Do not remove the plastic seals from the indoor
equipment and the appropriate refrigerant pipe
until immediately before you connect them.
2. Align the refrigerant pipes correctly, make sure
the dimensions of the connecting refrigerant pipe
are the same. Place the screw connector on the
refrigerant pipes just on to the thread on the
indoor equipment and tighten the first few
threads by hand.
IMPORTANT:
Before you continue, it is essential that you read
the following instructions carefully.
•DO NOT remove the sealing caps and stoppers until
immediately before you install the lines.
•To prevent leaks, ensure that the quick-release screw
connections are absolutely free of dirt. Moisture or
foreign bodies will adversely affect the function of the
quick-release connectors, leading to a risk of
refrigerant loss (not covered by the warranty).
•Only install refrigerant lines outdoors in dry weather.
•The refrigerant lines must not be plastered over after
installation.
•Please make sure that refrigerant is never allowed to
enter the environment. Improper handling of
refrigerant may be harmful to health. Always wear
work gloves and goggles when handling refrigerant.
•Do not smoke during installation work. The equipment
must never be operated without refrigerant lines
connected; otherwise, the equipment will be damaged
immediately.
•The screw connections may only be tightened using
appropriate open ended (i.e. crescent or adjustable)
wrenches.
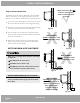
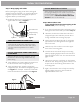
•Remove the plastic side panel to
access the lineset connectors.
•Remove the connector at the
bottom by unthreading by hand
and then replace with the
adapter. This will allow the fitting
to work with the 24K air handler.
Line Set Adapter Kit