
Install Manual


Page 33
mrcool.com
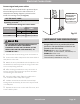
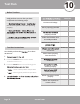
Refrigerant Piping Connection
IMPORTANT
Refrigerant
piping
Drain hose
Non-Adhesive U.V.
Tape
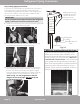
Step 7: Wrap piping connections
In this step you will insulate the exposed line connections
coming from the indoor air handler with the supplied
sound deadening pads and insulation. Then wrap the line
set from the outdoor unit to the exterior wall hole with
the supplied Non-Adhesive U.V. Tape.
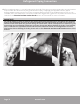
Wrap the connectors at the indoor air handler tightly with
the supplied sound deadening pads.
Now, place the supplied insulation material over the
connectors and exposed refrigerant piping.
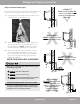
Now, starting at the outdoor condenser and working
your way up to the exterior wall hole, you will wrap
the line set, cables, and drain hose together tightly
using the supplied Non-adhesive U.V. tape. The drain
pipe will need to be at the bottom of the bundle
(Refer to Fig. 7.3, the image below, and the
diagram on the next page). DO NOT wrap the
end of the drain hose.
Do not complete these steps until all of the refrigerant
piping connections have been checked for leaks.
1.
2.
3.
Fig. 7.3
Wrapping the piping
upward will prevent
rain/moisture from
seeping into the
overlaps of the tape
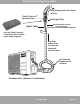
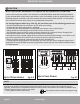
If you would like the exterior piping on the
side of your home to have a sleeker, more
attractive look and add some extra protection
in the process, you can purchase a MRCOOL
LineGuard® Line Set Cover. This will encase
your refrigerant piping and lines, protecting
them from harsh weather conditions and sun
exposure, which will extend the life of your
system. These covers are available in various
sizes to fit your particular application.
MRCOOL LineGuard® Line Set Cover