
Install Manual


All of these steps must be completed BEFORE powering the unit, or else it could damage it.
IMPORTANT:
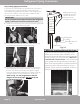
You will be asked to check for leaks at the piping connections multiple times throughout the following
steps of the installation, because the pressures within the lines will change once the unit is turned on
and this could reveal leaks not present during the initial check. These are imperative to make sure your
connections are not allowing refrigerant to escape the system. When checking for leaks, if any bubbles
form, it indicates the system has a leak and the screw connector needs to be retightened. For more
information about checking for leaks, please refer to the Electrical and Gas Leak Checks section of the
manual.
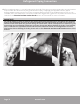
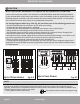
After completing steps 1-3, you will now need to check all of the piping connections (at indoor unit and outdoor
unit) for leaks. You can do this by using leak detection spray, or applying a soapy water solution (liquid
detergent/water mixture) to the connection via a spray bottle or brush. If any bubbles begin to form, it is an
indication there is a leak and the connection needs to be retightened. Tighten the connection and recheck it for
leaks. Refer to Electrical and Gas Leaks Checks section of this manual for more information.
4.
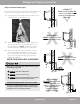
Refrigerant Piping Connection
Refrigerant Piping Connection
Page 31
mrcool.com