
Install Manual


1.
Page 30
mrcool.com
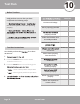
Refrigerant Piping Connection
2.
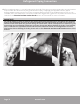
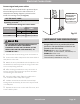
Using the images below as a guide, remove the cover
on the top valve, using a 19 mm open-ended wrench
or a crescent (adjustable-type) wrench. Then, insert a
5 mm Allen key and open the valve by turning it
counter-clockwise as far as it will go. DO NOT force it.
The valve is now open. Screw the cover back onto the
top valve and tighten it well to ensure that it is
properly sealed.
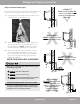
Using the images below as a guide, repeat the same
process for the bottom valve. Remove the cover on
the bottom valve, using a 19 mm open-ended wrench
or a crescent (adjustable-type) wrench. Then, insert a
5 mm Allen key and open the valve by turning it
counter-clockwise as far as it will go. DO NOT force
it. Screw the cover back onto the bottom valve and
tighten it well to ensure that it is properly sealed.
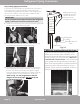
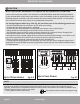
After opening all of the line set connection valves, you must also open the two main valves (King Valves), as
shown in the images below. To do this, first unscrew the caps from the valves in a counter-clockwise direction
using an appropriate-sized wrench, or crescent (adjustable-type) wrench. Then, insert a 5 mm Allen key and
open each of the valves by turning them counter-clockwise as far as they will go. DO NOT force it. Then, reinstall
the caps and tighten them securely to ensure that they are properly sealed.
3.
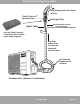
Step 5: Opening the refrigerant valves of the outdoor unit
CAUTION
All of these steps must be completed BEFORE powering the unit, or else it could damage it.
King
Valves
If the King Valves are not fully opened, it could cause the system to malfunction and suffer damage.
CAUTION