
Install Manual


Page 26
mrcool.com
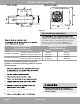
3.1 Tools needed
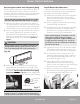
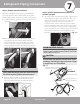
Step 3: Connect Line Set to Indoor Unit
about connecting the refrigerant line connectors
IMPORTANT:
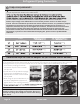
1.
2.
Align the refrigerant pipes correctly, making sure
the dimensions of the connecting refrigerant pipe
match. Unscrew the seals and place the screw
connector of the line set pipe just onto the
threads of the piping from the indoor unit, and
tighten the first few threads by hand.
IMPORTANT:
Before you continue, it is essential that you read
the following instructions fully and carefully.
3.2 IMPORTANT INFORMATION
PLEASE READ FULLY BEFORE PROCEEDING
}
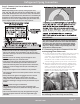
Or 2x Crescent
(adjustable-type)
Wrenches
Opened-ended wrench sizes needed
(1x of each of these)
12K & 18K 24K & 36K
3/4” / 19 mm 3/4“ / 19 mm
7/8” / 22 mm 15/16“ / 24 mm
15/16” / 24 mm 1“ / 26 mm
1” / 26 mm 1-1/8” / 29 mm
1-1/4” / 31 mm
1x HVAC Torque Wrench (if available)
1x Allen key, 5 mm
1x Phillips-head screwdriver
1x leak-detection spray or a soapy water solution
(liquid detergent/mix, applied by brush or spray bottle)
.
.
.
.
.
The line sets are designed to only be installed once.
The seal within the line set cannot be guaranteed if
they are installed more than once. This will void the
warranty. They also contain a compression fitting
to seal and do not require a thread sealent (teflon
tape, etc.). Using a sealent may actually cause the
connection to leak over time.
Do not remove the plastic seals of the piping coming
from the indoor unit, or the appropriate line set
connector, until immediately before you connect
them. The plastic seals on each of the connectors
should be color-coded to match the seals of the
corresponding pipes they are to be connected to.
NOTE: Depending on the capacity rating of your unit,
(12K, 18K, 24K, 36K) the wrench sizes needed will vary, refer
to the table below (the unit uses metric sizes, the standard
sizes listed are approximations). Based on the availability of
wrenches in some of the sizes needed, the recommended
method is to use crescent (adjustable-type) wrenches that
can be adjusted to fit the size each step requires.
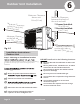
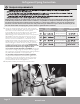
3.3 Connecting the Quick Connect® Line Set
to the piping from indoor unit
Refrigerant Piping Connection
Follow the instructions for connecting the refrigerant
pipes to the indoor unit and outdoor unit. We can only
provide a warranty if the lines are installed as described in
the instructions.
DO NOT remove the sealing caps and stoppers until
immediately before you install the lines.
To prevent leaks, ensure that the quick-release screw
connections are absolutely free of dirt and moisture.
These will adversely affect the quick-release connectors,
leading to a risk of refrigerant loss (not covered by the
warranty).
Only install refrigerant lines outdoors in dry weather.
The refrigerant lines must not be plastered over after they
are installed.
Always wear work gloves and goggles and use caution
when handling refrigerant. Please make sure that
refrigerant is never allowed to enter the environment.
Improper handling of refrigerant may be harmful to your
health.
DO NOT smoke during the installation.
The equipment must never be operated without the
refrigerant lines connected, otherwise damage will occur
immediately.
The screw connections may only be tightened using the
appropriate open-ended or crescent (adjustable-type)
wrenches.
.
.
.
.
.
.
.
.
.
Pat. https://mrcool.com/mrcool-patents/