
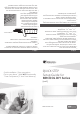
Quick Start Guide

STEP 1
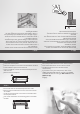
Locate the wall template.
Place the template on the wall at the installation location.
Leave sufficient space for the wall hole
Use the template to mark the indicated drill points and
wall hole site.
Remove the wall template.
STEP 2
Drill screw holes at the indicated points into studs.
Remove the metal bracket from the rear of the interior
air handler.
Screw the metal bracket to the wall in accordance with
the template outline.
Use a level and Ensure the mounting plate is flush with
the wall.
STEP 8
Place the provided batteries in the remote control.
Press the Power button on the remote control.
The MrCool DIY Series unit should activate
automatically.
If you wish to use your smartphone, refer to the
SMART CONTROLLER Manual, located in the SMART
CONTROLLER box for setting up WiFi control via the
MRCOOL app
Enjoy!
STEP 3
Drill through the wall to accommodate the copper
lineset, condensate drain, and wire connection to the
exterior condenser.
Insert the protective wall sleeve.
Bundle the copper lineset, condensate drain, and wire
connection. The condensate drain MUST be on the
bottom of the bundle.
Push the bundled lineset, drain, and wire through the
wall hole.
Snap the air handler into place on the previously
mounted metal wall bracket.
STEP 7
Remove the brass caps from the valves on the exterior
condenser unit.
Use an allen wrench to open the valve until it fails to
turn any further. Be sure not to exert excessive force
on the valve. During this activity, you may hear a soft
hissing sound as a slight amount of R-410a refrigerant
exits the condenser.
Apply soapy water or leak detection spray to the quick
connect fittings. If you see bubbles, this indicates there
is a leak. Tighten the connection accordingly until the
bubbles disappear.