
Install Manual

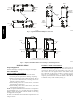
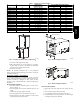


Table Of Contents

3
Table 1 – CAPMP Cased Coil Information
MODEL SIZE (TON)
FLUSH FIT TO
FURNACE WIDTH
COIL CONNECTION TUBE SIZE (IN.)
Liquid Suction
CAPMP1814ALA 1.5 14---3/16” / 360 mm 3/8 5/8
CAPMP1917ALA 1.5 17---1/2” / 445 mm 3/8 3/4
CAPMP2414ALA 2.0 14---3/16” / 360 mm 3/8 5/8
CAPMP2417ALA 2.0 17---1/2” / 445 mm 3/8 5/8
CAPMP2517ALA 2.0 17---1/2” / 445 mm 3/8 3/4
CAPMP3014ALA 2.5 14---3/16” / 360 mm 3/8 3/4
CAPMP3017ALA 2.5 17---1/2” / 445 mm 3/8 3/4
CAPMP3614ALA 3.0 14---3/16” / 360 mm 3/8 3/4
CAPMP3617ALA 3.0 17---1/2” / 445 mm 3/8 3/4
CAPMP3717ALA 3.0 17---1/2” / 445 mm 3/8 3/4
CAPMP3721ALA 3.0 21” / 533 mm 3/8 7/8
CAPMP4221ALA 3.5 21” / 533 mm 3/8 7/8
CAPMP4321ALA 3.5 21” / 533 mm 3/8 7/8
CAPMP4821ALA 4.0 21” / 533 mm 3/8 7/8
CAPMP6021ALA 5.0 21” / 533 mm 3/8 7/8
CAPMP6024ALA 5.0 24---1/2” / 622 mm 3/8 7/8
CAPMP6124ALA 5.0 24---1/2” / 622 mm 3/8 7/8
3” (76mm)
A13062
Fig. 3 -- Downflow Installation With Coil Rotated 90_
1. Set cased coil on supply duct opening.
2. Place field fabricated 3” (76 mm) adapter on coil casing.
Adapter should be tapered to fit coil/furnace combination
when one of them is larger than the other.
3. Set furnace on adapter.
NOTE: In downflow installation with a 4--way multipoise
furnace, break off perforated duct flanges on furnace. See furnace
installation instructions.
Horizontal CAPMP Coil Installation
The unit can be installed on a work platform, secured to roof truss
in attic, suspended from hangers on floor joists in crawl space, or
installed on blocks. It is designed to allow airflow in either
direction, to mate with horizontal--left or horizontal--right furnace
installations.
Horizontal Right Installation
1. Use field fabricated attachment plates to secure coil to
furnace. (See Fig. 4.)
2. Use self--tapping screws to mount attachment plates to coil
casing.
3. Connect furnace snugly against coil casing.
4. Use self--tapping screws to attach furnace. (See Fig. 5.)
5. Seal joint between coil casing and furnace to create air tight
seal using locally approved materials.
Self-Tapping Screws
A13065
Fig. 4 -- Horizontal Right Installation
A13063
Fig. 5 -- Horizontal Right Installation
Horizontal Left Installation
1. Unbend the 4 tabs at the right side of the casing. (See Fig.
6.)
2. Connect furnace snugly against coil casing.
3. Use self--tapping screws to attach furnace. (See Fig. 7.)
4. Seal joint between coil casing and furnace to create air tight
seal using locally approved materials.
CAPMP