
Install Manual

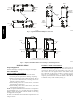
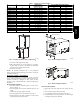


Table Of Contents

2
Evaporator
Coil
Return
Supply
Return Supply
Horizontal Left Furnace Installation
Horizontal Right Furnace Installation
A13059
Downflow
Furnace
Installation
Upflow
Furnace
Installation
Return
Supply
Return
Supply
Evaporator
Coil
A13060
Fig. 1 -- Typical Installation Multipoise Cased Coils
* CAUTION: DO NOT MOUNT COIL LOWER THAN
3˝ (76mm) MINIMUM OR FURNACE FAILURE MAY RESULT
Wide Coil
Narrow Coil
Narrow Furnace
Wide Furnace
Field Fabricated
Adapter(s)
3˝ (76mm)
A13061
Fig. 2 -- Adapter(s) Installation When Coil Overhangs or Underhangs Furnace
INSTALLATION
Inspect Equipment
File claim with shipper if equipment is damaged or incomplete.
Select Installation
Upflow CAPMP Coil Installation.
The cased coil is designed to fit furnaces of the same width.
1. Set coil in place on upflow furnace discharge air opening.
2. Ensure coil is level for proper condensate drainage. Do not
tip coil toward condensate drain. Coil casing need not be
fastened or screwed to furnace.
3. When installing wider coil on narrow furnace, create field
fabricated adapter. (See Fig. 2.)
4. When installing narrow coil on wide furnace, create field
fabricated adapter. (See Fig. 2.)
NOTE: On upflow installations where the indoor coil is placed in
an unconditioned space, a 6” (152 mm) wide piece of insulation
should be applied and wrapped around the outside of coil casing
and supply duct contact point.
See Table 1 for dimensions. Note instructions for placement of coil
casing on furnace.
Downflow CAPMP Coil Installation.
IMPORTANT: Installing “A” coils rotated 90_ from the front of
the furnace in downflow applications can cause water blow off or
coil freeze up. This is due to the concentration of air on one coil
slab or lack of air on the opposite coil slab. If the airflow is high
due to ductwork or other causes, and there is a chance for water
blow off, it is recommended that a 3” (76 mm) field--supplied
adapter be placed between the coil and the furnace to allow the air
to distribute evenly to both coil slabs. (See Fig. 3.)
CAPMP