
Controls Installation Sheet


mr
.
steam
®
INSTALLER INFORMATION
__________________________________________________________________
6
6b
6a
7
Installation with Optional Rough-In Box (cont.)
IMPORTANT NOTE: Be careful not to strain, staple, pinch or
otherwise damage the cables. Route cables as required to permit
replacement. Do not route cables inside conduit together with power
lines or close to hot water or steam piping.
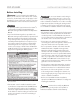
STEP 6
Use the rough-in box as a guide to cut out the
(3
9
⁄16” x 5
1
⁄4”) opening in the wall.
Finish the iSteam
®
3 installation using the instructions on page 7.
Installation without Rough-In Box
STEP 1
Make a 3
9
⁄16” x 5
1
⁄4” cut-out in the desired location using the
template provided on page 2 of this manual.
STEP 2
Route the control cable from the wall cutout to the steam
generator. Connect one end of the cable to the steam generator
connector. The two ends of the control cable are the same.
IMPORTANT NOTE: Be careful not to strain, staple, pinch or
otherwise damage the control cable. Route cable as required to
permit replacement. Do not route cable inside conduit together
with power lines or close to hot water or steam piping.
Finish the iSteam3 installation using the instructions on page 7.
Rough-In box used as
a guide to cut out the
opening.
3
9
⁄16”
5
1
⁄4”