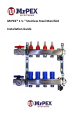
MrPEX® 1 ¼ “ Stainless Steel Manifold Installation Guide
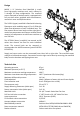
Design MrPEX 1 ¼“ Stainless Steel Manifold is made from high quality stainless steel, and is offered in 2 through 12 loop configurations. The manifold comes mounted on brackets and it is equipped with full port ball valves provided with thermometers, manual air vents and fill/drain valves. The SUPPLY (upper) manifold is fitted with balancing flowmeters with readable range of 0 to 2 GPM that allow flow adjustment of each individual loop.
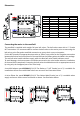
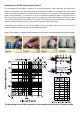
Dimensions Part# 3250200 3250300 3250400 3250500 3250600 3250700 3250800 3250900 3251000 3251100 3251200 2 Branches 3 Branches 4 Branches 5 Branches 6 Branches 7 Branches 8 Branches 9 Branches 10 Branches 11 Branches 12 Branches Length L (inch) 10.6” 12.6” 14.6” 16.5” 18.5” 20.4” 22.4” 24.4” 26.3” 28.3” 30.3” Weight (lb) 7.1 8.0 9.0 9.9 10.8 11.5 12.7 13.6 14.5 15.5 16.4 Connecting the mains to the manifold The manifold is supplied with straight full port ball valves.
Position 1 2 3 4 5 6 7 8 9 10 11 12 13 14 15 16 Position 3250018 3250001 3250002 3761175 3741172 3740011 3741171 3741173 3741174 3740002 3250010 3250007 *** 5700010 5120700 5120701 Description Manifold Ball Valves, supply & return, straight, w/ thermometer, spare part Thermometer, spare part 1" BSP Manifold Connection X G 1-1/4" Union Flat Gasket, spare part Flat Gasket 1-1/4", spare part Flowmeter for manifold series 325XXX and 332XXX, spare part Manual Air Vent, spare part 1-1/4" Manifold Bracket for ma
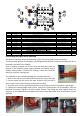
Pressure Testing the Manifold To ensure the system is installed correctly and without leaks, it is necessary to do a pressure test. The pressure test can be done with pressurized air or water. However, due to the risk of water freezing and damaging the system, MrPEX recommends air testing. To make the test, connect the MrPEX® pressure test kit with a 0÷100 psi gauge and an air valve, or other pressure test device, to the manifold.
Balancing the Manifold and Loops Balancing the manifold is the key to having the right heat delivered to the correct loop, zone, or room. The manifold is the distribution point where all the loops connect. Depending on design requirements, each loop will cover a specific area, and subsequently, its length and heat demand will be different from that of the other loops on the manifold.
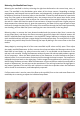
Installation of MrPEX Valve Actuator 24V AC The installation of the MrPEX® actuators is very easy and quick. After removing the blue plastic manual valve knob on the return manifold, by hand screw the plastic VA 10 adapter onto the on/off valve. The actuator snaps on to the adapter with a slight push. The actuators are supplied partially open to aid installation. It is necessary to cycle the actuator completely before it will close all the way. On start up, power the actuator and let it completely open.
Copyright © 2018 MrPex® Systems All Rights Reserved. First Edition issued on May 2018 Contents of this document not binding for the Company. ET-IM0363 REV.