
Operating instructions


10
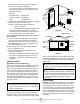
Installation Instructions and Owner’s Manual
Unvented Natural Gas Fired Room Heater
8. Turn off heater (see To Turn OFF Gas to Appli-
ance, page 10.
9. Replace lower front panel.
OPERATING YOUR HEATER
FOR YOUR SAFETY READ BEFORE LIGHTING
WARNING: If you do not follow these instructions
exactly, a re or explosion may result causing prop-
erty damage, personal injury or loss of life.
A. This appliance has a pilot that must be lighted
by hand. When lighting the pilot, follow these
instructions exactly.
B. BEFORE LIGHTING smell all around the appli-
ance area for gas. Be sure to smell next to the
oor because some gas is heavier than air and
will settle on the oor.
WHAT TO DO IF YOU SMELL GAS
• Do not try to light any appliance.
• Do not touch any electrical switch; do not use
any phone in your building.
• Immediately call you gas supplier from a neigh-
bor’s phone. Follow the gas supplier’s instruc-
tions.
• If you can not reach your gas supplier, call the
re department.
• Use only your hand to push in or turn the gas
control knob. Never use tools. If knob will not
push in or turn by hand, don’t try to repair it; call
a qualied service technician or gas supplier.
Force or attempted repair may result in a re or
explosion.
• Do not use this appliance if any part has been
underwater. Immediately call a qualied service
technician to inspect the appliance and to re-
place any part of the control system which has
been underwater.
LIGHTING INSTRUCTIONS
1. STOP! Read the all safety information included
with and on the side of heater.
2. Check that gas supply to heater is on.
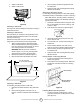
3. Push in gas control knob and slightly turn clock-
wise to the OFF position (see gure 16).
Note: Knob cannot be turned from PILOT to OFF
unless knob is pushed in slightly. Do not force.
4. Wait ve (5) minutes. Then smell for gas, in-
cluding near the oor. If you smell gas, STOP!
Follow “B” in the safety information above. If
you do not smell gas, go to the next step.
5. Push in gas control know slightly and turn
counterclockwise to PILOT/IGN and depress
for ve (5) seconds.
Note: The rst time that the heater is operated after
connecting the gas supply, the control knob should
be depressed for about 30 seconds. This will allow
air to bleed from the gas system.
6. Push in control knob and rotate control knob
back to OFF position then rotate counterclock-
wise to PILOT/IGN position. This will light pilot.
If needed gently keep rotating control knob
back and forth while depressed until pilot lights.
7. Keep control knob depressed in for ten (10)
seconds after lighting pilot. If pilot goes out,
repeat steps 4, 5, 6 and 7.
If pilot does not stay lit, refer to Troubleshoot-
ing, pages 12-13. Also, contact a qualied
service person or gas supplier for repairs.
If control knob does not pop up when released,
contact a qualied service person or gas sup-
plier for repairs.
8. FOR IR10NG: Turn control knob to “LO” to light
heater. Leave on “LO” position until the left
burner tile has turned bright orange.
After left burner tile has turned bright orange,
adjust heat output by turning Control Knob to
desired position (“LO” or “HI”). Note: Both tiles
turn orange only on HI setting.
FOR BF10NG: When the pilot is lit, turn the control
knob to “HI” position to light.
FOR BF10NG: After ame is established on “HI”,
adjust heat output by turning control knob to de-
sired position (“LO” or “HI”). Do not operate heater
between locked positions.
Figure 16
CAUTION: Do not try to adjust heating level by using
equipment shutoff valve.
WARNING: When running heater, set control knob
at “LO” or “HI” locked positions. Poor combustion
and higher levels of carbon monoxide may result
if heater is operated with control knob positioned
between locked positions.
IMPORTANT: Release downward pressure while turn-
ing control knob. Control knob must be locked at the
desired position.
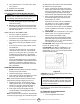
TO TURN OFF GAS TO APPLIANCE
SHUTTING OFF HEATER:
1. Turn off equipment shutoff valve.
Control Knob