
Installation Guide

Re-check that the sink is evenly
aligned with the countertop.
Attach and tighten the clip
brackets against the edge of the
sink. Do not tighten one screw
completely before others. Par-
tially tighten one clip then the
one across from it, and so on
until all clips are fully tightened.
This will safeguard against an
uneven or insecure installation.
Use a cloth with denatured
alcohol along the perimeter
of the sink and countertop to
remove any excess sealant.
Using the template provided,
measure and cut the hole in the
countertop.
Determine the locations for the
clip brackets around the perime-
ter of the sink. Pre-drill holes for
the clips using appropriate meth-
ods for the countertop material.
With denatured alcohol, clean the
surfaces of the sink and counter-
top which will meet.
Topmount: Apply a bead of
silicone along the top perimeter
edge of the counter opening.
Undermount: Apply a bead of
silicone along the perimeter edge
of the openning on the underside
of the counter.
Topmount: Carefully align the
sink over the countertop opening
and lower into position, applying
pressure to secure a seal of the
silicone against the countertop.
Undermount: Carefully align the
sink under the countertop open-
ing and raise into position,
applying pressure to secure a seal
of the silicone against the coun-
tertop.
More on Front q
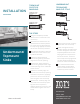
THE STEPS
INSTALLATION
CONTINUED
877.946.5725
Toledo, Ohio
Sales@MRDirectInt.com
www.MRDirectInt.com
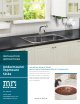
Undermount/
Topmount
Sinks
STAINLESS STEEL
TOPMOUNT CLIP
(MX Series)
STAINLESS STEEL
TOPMOUNT CLIP
(US Series)
TOPMOUNT
CLIP STYLE
SAMPLING
UNDERMOUNT
TECHNIQUES
AND CLIP STYLE