
User`s guide


19
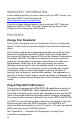
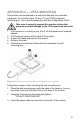
APPENDIX D — VESA MOUNTING
This monitor can be attached to a wall-mounting arm you purchase
separately. This monitor has a 75 mm x 75 mm VESA compliant
mounting pad. Use a wall mounting arm with this configuration ONLY.
Take care to properly support this monitor during this
procedure so that damage to the LCD panel does not occur.
1. If the monitor is currently in use, turn it off and disconnect the power
adapter.
2. Pull the screw covers off the back of the monitor.
3. Support the base and remove the screws.
4. Remove the base.
5. Follow the manufacturer's instructions to assemble the wall-
mounting arm.
Figure 6:
Installing an optional wall-mounting arm (not supplied)
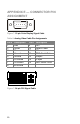
Follow these steps to finish installing the wall-mounting arm:
1. Place the wall-mounting arm onto the back of the monitor. Line up
the holes of the arm with the holes in the back of the monitor.
2. Insert the 4 screws into the holes and tighten.
**DO NOT OVERTIGHTEN**
3. Insert the power cable into the slot on the back of the monitor.