
User`s guide


10
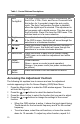
Table 1: Control Buttons Descriptions
Feature Description
1Auto
Config/Exit
The Auto Config button is used to automatically set
the H-Pos, V-Pos, Clock, and Focus. Press and hold
this button for 2 seconds to begin the auto config
cycle. The Auto Configuration function is disabled
when the digital input is selected. This adjustment is
not necessary with a digital source. This also acts as
the Exit button. Press it to close the OSD menu. This
will also back out of a menu selection.
2 Brightness
/
Press this button to adjust your monitor’s brightness.
If the OSD is open, this button will move through the
selections in a clockwise direction.
3 Contrast
/
Press this button to adjust your monitor’s contrast. If
the OSD is open, this button will move through the
selections in a counter-clockwise direction.
4 Menu/Enter Press this button to open the On Screen Display
(OSD) menu or to select an adjustment icon within
the OSD.
5 Power
Indicator
Power Indicator:
Green = power on mode (normal operation)
Orange = low power mode (low power consumption;
no picture)
6 Power
Button
Press this button to turn the monitor on and off.
Accessing the Adjustment Controls
The following list explains how to access and use the adjustment
controls appearing in the On Screen Display (OSD) Main Menu:
1 Press the Menu button to make the OSD window appear. The menu
will look like Figure 5.
2 Press the
or buttons to select the desired function.
3 Press the Menu button to select the function that you want to adjust.
4 Press the
or buttons to change the settings of the current
function.
• When the OSD window is active, it shows the input signal timing.
The H stands for the horizontal frequency and V for the vertical
frequency.
• To exit and save, select the exit functions, or leave the monitor
alone for 10 seconds. To adjust any other function, repeat 2-4.