
Troubleshooting Guide
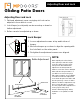

Adjusting Door and Lock
Adjusting Door and Lock
1. Flat head adjustment screw on single point lock can be
adjusted to move latch in or out.
2. Lock Keeper (on side jamb) can be moved up or down for
further adjustment.
3. Rollers can also be adjusted up or down.
NOTE:
When adjusting the rollers, lift the
active panel up to take the weight
of the door panel off of the rollers.
If the panel is still installed while
adjustments are being made the
stainless steel rollers can be damaged
which will effect the performance of
your MP Doors. Remove the plugs
with a flat screwdriver. Insert a phillips
screwdriver and find the adjustment
screw inside the panel. Clockwise will
raise the panel up, counter clockwise
will lower it. All three adjustments may
be necessary. Over time, your patio
door may require further adjustment to
ensure proper locking. Door
must be shimmed properly during
installation so it is plumb, level and
square.
Gliding Patio Doors
Adjustment Screws
Lock Keeper
Lock Keeper
1. Loosen adjustment screws at top and bottom of
keeper.
2. Move the keeper up or down to align the opening with
the lock/latch on the active panel.
3. Re-tighten the adjustment screws once aligned.
Rough
Opening
Width
Rough
Opening
Height
Sealed
Interior
Exterior
Exterior
Sheathing
Caulking
Floor
Nailing Fin
Nailing Fin
Caulking
Groove
#10x3” Flathead Screw
Nailing Fin
Nailing Fin
Exterior
Sheathing
2” Roong Nails
Stationary
Jamb
Exterior View
8”
~16”
~16”
8”
42.5”
Shims
8”
~16”
~16”
8”
42.5”
Shims
Shims
Level
Check Diagonal
Measurements
Shim
Interior
Exterior
Wall
Exterior
of Frame
Level
NOTE:
Door and Wall
Must be Plumb
Active Panel
Anti-Lift Block
(head jamb)
#10x3”
Flathead
Screw
Installation
Screw Plug
Lock Keeper
#8x3”
Panhead
Screw
Active Panel
Active Panel
Plug
Plug
Phillips
Screwdriver
FLAT SCREWDRIVER
FLAT SCREWDRIVER
Roller Adjustment