media center user guide software version 4.
The information contained in this document is provided solely for use in connection with Digeo products and services. Digeo, Inc. reserves all rights in and to such information and the products and services discussed herein. This document should not be construed as transferring or granting a license to any intellectual property rights, whether express, implied, arising through estoppels or otherwise. EXCEPT, AS MAY BE AGREED IN WRITING BY DIGEO, INC.
all DVRs were not created equal 2 Contents List of figures ............................................ iv List of tables............................................... v Introduction ............................................... 1 Powerful browsing and search tools............ 2 Watch and record in high-definition............ 3 Take charge of your TV ............................... 3 Other great applications.............................. 3 Extend the media center to a second TV .....
Creating a PIN ....................................... 35 Changing a PIN ..................................... 36 Locking channels or programs by rating. 36 Turning off parental controls ................. 37 Controlling Pay Per View or On Demand purchases .............................................. 38 If you forget your PIN ............................ 38 Using and programming the remote ..... 41 Functions of the Moxi remote ................... 42 Multi-function buttons ..........................
all DVRs were not created equal List of figures Figure 1: Conceptual view of the Moxi Menu ......................................... 2 Figure 2: The Moxi remote control ......................................................... 9 Figure 3: Channels list in the Moxi Menu.............................................. 10 Figure 4: Channels list action menu...................................................... 10 Figure 5: Change Time Slot card...........................................................
Figure 46: Ventilation requirements ...................................................... 60 Figure 47: Media center front panel (some models differ)...................... 61 Figure 48: Media center rear panel (some models differ) ....................... 61 Figure 49: Moxi Mate front panel.......................................................... 62 Figure 50: Moxi Mate rear panel and connections ................................. 62 Figure 51: Connecting an HDTV or EDTV and digital audio...................
1 Introduction Powerful browsing and search tools..................................................................... Watch and record in high-definition..................................................................... Take charge of your TV ........................................................................................ Other great applications ...................................................................................... Extend the media center to a second TV .........................
Introduction The Moxi Menu is the easiest, most intuitive way to browse and command the expanding range of programming content and services. Powerful browsing and search tools The Emmy® Award-winning dual-axis navigation (see figure 1) puts content choices right at the top of the menu instead of forcing you to dig through several levels of menus. Searching through hundreds of channels one by one is no way to find shows.
Introduction all DVRs were not created equal Watch and record in high-definition Take charge of your TV The Moxi service offers robust high definition TV (HDTV) so you can watch and record crystal-clear high definition programming. Digital Video Recording (DVR) allows you to get more from your TV service provider. With Moxi, you can watch TV on your own schedule. Never miss your favorite shows, even if two are on at the same time.
Introduction DVD player — The on-screen menu for DVDs makes it easy to switch to alternate commentary, language tracks, and subtitles (some models). Using this guide Games — Enjoy traditional arcade games such as Mahjong, Video Poker, Slot Machine, and more. Each chapter includes a short table of contents at the beginning and a blue box at the end directing you to the next step in the process or further information on recently discussed subjects.
all DVRs were not created equal Introduction 1 The next steps • • • • To jump right into using Moxi, go to Using Moxi on page 7. To customize Moxi to suit your equipment and configuration, see Changing settings on page 29. See Using and programming the remote on page 41 to learn how to configure the remote for your TV. Do you have a specific question? Use the Glossary on page 93 and Index on page 97 to find the answer. © 2006 by Digeo, Inc. All rights reserved.
Introduction 6 Media Center User Guide © 2006 by Digeo, Inc. All rights reserved.
2 Using Moxi Using the remote control ..................................................................................... 8 Navigating the Moxi Menu ................................................................................ 10 Learning about Moxi.......................................................................................... 11 Searching for shows .......................................................................................... 12 Remembering your favorite channels ...............
Using Moxi This chapter tells you all you need to know to become an expert user of the Moxi Menu. Using the remote control The Moxi remote allows full control of the media center and provides volume controls for your TV or audio receiver. Buttons on the remote are organized by function. Many buttons have multiple functions depending on whether you are in the Moxi Menu, watching fullscreen TV, or using an application such as Jukebox.
all DVRs were not created equal * locks and unlocks SuperTicker items ticker displays and hides SuperTicker power turns the TV and audio receiver on and off on demand jumps to the On Demand category live TV jumps to full-screen live TV play starts a recorded program, song, or album rew multi-speed rewind for playback (press multiple times to select speed) fwd multi-speed fast forward for playback (press multiple times to select the speed) rec starts a recording stop stops a program, song, or album pause pa
Using Moxi Navigating the Moxi Menu 4. When you find a show to watch press OK and the action menu appears (see figure 4). The Moxi Menu works by filtering TV programs and features into categories such as Channels, Movies, Sports, Kids, and more. These category cards appear in the horizontal band. The vertical band contains the list of choices for that category. 5. Press OK again to watch the show. The O.C. 62 Love, Inc.
Using Moxi all DVRs were not created equal Alternatively, change the time slot by using the remote (see figure 6). Advances the category schedule 30 minutes. Goes back 30 minutes (if you are viewing future listings). Advances the category schedule 24 hours. Goes back 24 hours (if you are viewing future listings). One press returns the schedule to the current time.
Using Moxi Searching for shows Use either the arrow and OK buttons... There are many ways to find shows. Besides channel or menu surfing, you can search by title, keyword, or by category. ...or the number buttons to enter letters. Searching by title or keyword 1. In the Moxi Menu, scroll to the Find & Record category (see figure 8).
Using Moxi all DVRs were not created equal Searching by category Using the Moxi Flip Bar The search by category method organizes shows scheduled in the next 24 hours into category or genre filters such as movies, drama, comedy, and so on. Some categories include a card, such as more movies that shows additional matches for the next two weeks or so. Shows may appear in more than one genre.
Using Moxi Using the player bar never less than 30 minutes (10 minutes for HDTV). When you change channels, temporary memory may be cleared. The player bar appears whenever you press a playback control button (see figure 13) and provides information about the duration of the program and your current playback state (see figure 14).
Using Moxi all DVRs were not created equal Recording shows To schedule a recording, highlight it in the Moxi Menu, and then press the rec button (or simply press rec if you are already watching the show). Alternatively, press OK, and then choose one of the following recording options: • Record once — To record only the current episode of the show. • Record series — To record this show every time it airs on the current channel. • See all times — To see other times the show will air in the future.
Using Moxi The background color of a program card indicates whether the show is on now, in the future, recorded, or being recorded (see figure 17). Fishing With Greg... Premiership Soccer Shows with the brown background and exclamation point or square are recorded. Shows with the recording icon are being recorded now. Recording options To change recording options when the scheduled show is in center focus, press OK, and then choose recording options from the options list.
Using Moxi all DVRs were not created equal • • Keep: The default setting is two days, which means the program is eligible for deletion after two days, but not deleted until space is needed for new recordings. You can choose to keep the program protected until space is needed, up to four days, or until you delete it manually. The O.C. #4 Monster Love, Inc.
Using Moxi • Episode Limit: This sets the maximum number of episodes of the series that the media center will record. If the maximum is reached, new recordings of the series replace the oldest recording of the series. The default setting is five but this can be changed to any number between one and five. You can also remove the limit by selecting unlimited. • Accept: The default setting is accept repeats. If you do not want repeat episodes recorded, choose first-run only.
Using Moxi all DVRs were not created equal To change the series priority: 1. Select recording options, and then series options from the action menu of any scheduled or recorded series recording card or go to the Series Options card within the Find & Record category. 2. Choose priority or change priority, depending on the menu. 3. The menu displays a numbered list of stored series. Select a series if one is not already selected. 4.
Using Moxi Reading the whole story Uploading photos All headlines have a story behind them. To read the story, press info on the remote. Use the next and back buttons to page through the story. 1. Attach a memory card reader to a USB port on the media center. The rear ports are USB 2.0 and significantly faster than the front USB ports. 2. Insert the memory card containing the photos into the card reader. 3. In the Photos category, choose load album.
Using Moxi all DVRs were not created equal 9/10/06 Would you like to add new photos now? 2 7/29/06 Please connect your memory card reader and insert your memory card. All Channels your new photos will be saved to a new album labeled with today’s date. 6/08/06 Set Relock Timer re record once no, close watch yes, upload Media Storage Capacity close see all times Photos 01/01/06 7/20/06 12 Photos default music 3% To delete or rotate this photo, press OK.
Using Moxi • Slideshow music — If you have Jukebox, you can select a saved music playlist to accompany the slideshow. Select slideshow music, and then choose a music playlist. While viewing photos in an album or during a slideshow: • Press fast-forward or rewind to speed up or slow down the slideshow. • Press pause to halt the slideshow in the current picture. • Press the right arrow, skip, or next to advance to the next photo.
Using Moxi all DVRs were not created equal DVD video resolutions Since the native resolution of DVDs is 480i, the media center automatically plays DVDs in either 480p or 480i, depending on your selections in the HDTV `Setup category. The media center automatically upconverts to 480p if 480i is not selected in the HDTV Setup category. Using Jukebox Jukebox allows you to play music using your media center, TV, and home theater equipment.
Using Moxi You can also choose to shuffle play all your music, or play it all in order. (There may be a delay when first playing a large catalog of music via PC Link.) Loading music Playing music To play music, scroll to the album, artist, or song, and then press OK. Choose play from the action menu. After a few minutes, a full-screen animated jukebox appears to prevent TV screen burn-in. If you have a media center with a CD/DVD drive: Creating a queue 1. 1.
Using Moxi all DVRs were not created equal Creating a playlist Once you have read the message, you can choose to exit the message, mark it as unread, or delete it. 1. Open the queue card, and then select save. 2. A new action dialog opens and prompts you to enter a name for the playlist. Playing Moxi games 3. Press the right arrow until save is highlighted, and then press OK. The playlist now appears in the main Jukebox category. There are several games available to you in the Games category.
Using Moxi 26 Media Center User Guide Code Breaker Blockbreaker Mahjong Invasion Wave Bubble Blast Blackjack © 2006 by Digeo, Inc. All rights reserved.
Using Moxi all DVRs were not created equal Video Poker 21 Frenzy 2 © 2006 by Digeo, Inc. All rights reserved.
Using Moxi The next steps • • • • 28 To customize Moxi to suit your equipment and configuration, see Changing settings on page 29. See Using and programming the remote on page 41 to learn how to configure the remote for your TV. To set up PC Link, see Enabling PC Link on page 53. Do you have a specific question? Use the Glossary on page 93 and Index on page 97 to find the answer. Media Center User Guide © 2006 by Digeo, Inc. All rights reserved.
3 Changing settings Channel List....................................................................................................... Sound Effects .................................................................................................... HDTV Setup....................................................................................................... Widescreen........................................................................................................ Audio Output ...................
Changing settings The Settings category is where you customize the default media center settings to suit your needs. Settings Sound Effects medium low mute close high Channel List The Channel List card displays all available channels. You can modify the list if there are channels you never watch, or do not want to appear in the main Channels category after you press the Moxi button you can modify the list. To modify the list: Figure 27: Adjusting the sound effects volume. 1.
Changing settings all DVRs were not created equal Setting standard TV video resolution Table 1: Video connections and supported resolutions Connection 480i (SD) 480p 720p 1080i DVI-D digital video X X X X Component video (YPbPr) X X X X S-Video X Composite video (V) X RF (some models) X IEEE 1394 (does not show user interface graphics or DVDs) X If your TV is a standard definition (SD) TV, make sure 480i is the only box checked. All other video resolutions will be output at 480i.
Changing settings Widescreen The widescreen settings only take effect if the broadcast is presented in 16:9, or widescreen, format. Wide mode — Horizontally squeezes widescreen video (16:9) to fit a standard TV (4:3). Choose this if you have a TV capable of showing widescreen programs correctly (in the original 16:9 aspect ratio). Letter box — Shrinks a widescreen picture to fill the screen and puts black or gray bars at the top and bottom of the screen. This is the best choice if you have a standard TV.
Changing settings all DVRs were not created equal Audio Output 3:55 10 Change the audio output type to match your audio connection and equipment (see table 2).
Changing settings Secondary Audio Closed Caption When you watch a TV that includes a secondary audio program (SAP), usually in a different language, the media center can pass that secondary audio stream to your TV or audio receiver. Most viewers use these setting to toggle closed captions on or off. 1. To enable or disable SAP, go to the SAP card in the Settings category. 2. Choose enable (or disable), and then chose close. 3. Change to the channel carrying the secondary audio stream. 4.
Changing settings all DVRs were not created equal PC Link Setup Parental Controls PC Link connects your media center to home computers. When connected, shared photos and music stored on the computer are listed in the Photos and Jukebox categories in the Moxi Menu, just like photos and music loaded directly on the media center. The parental control functions provided by the media center are robust.
Changing settings Changing a PIN TV-G 1. In the Settings category, scroll to the Parental Controls card. 2. Press OK. TV-Y7 3. Choose settings. TV-Y 4. Scroll left to the Change PIN card, and then press OK. 5. Enter the old PIN. 6. Enter the new PIN, and then enter the new PIN again to confirm it. FV In the Settings category, scroll to the Parental Controls card. 2. Press OK. 3. Choose settings. 4. Choose either TV Ratings, Movie Ratings or Lock By Channel.
Changing settings all DVRs were not created equal Turning off parental controls Locked 104 2:34 Amazing Stories 1. Press OK on any locked program. Proud Family, The 2. Enter your PIN to unlock all programming temporarily or choose more options to only unlock the current channel. Locked Locked Favorites To unlock or change all parental control settings, go to the Settings category, scroll to the Parental Controls card, and then press OK.
Changing settings The O.C. Love, Inc. Timer Set Relock Smallville Survivor When you unlock a show, you open a temporary viewing window. Parental I Shouldn’t Be Alive Controls are temporarily suspended during thisChannels time. Choose the amount of time to suspend Set Relock Timer Parental Controls when unlocking a show. After the chosen length of time, Parental Controls will re-lock automatically. Dog Whisperer, Change Time Slot The When you unlock a show, you open a temporary viewing window.
Changing settings all DVRs were not created equal 3 The next steps • • • • • © 2006 by Digeo, Inc. All rights reserved. To learn how to use the Moxi Menu, see Using Moxi on page 7. See Using and programming the remote on page 41 to learn how to configure the remote for your TV. To set up PC Link, see Enabling PC Link on page 53. For help, see Troubleshooting on page 71. Do you have a specific question? Use the Glossary on page 93 and Index on page 97 to find the answer.
Changing settings 40 Media Center User Guide © 2006 by Digeo, Inc. All rights reserved.
4 Using and programming the remote Functions of the Moxi remote ............................................................................ 42 Programming the remote................................................................................... 44 Infrared emitter ................................................................................................. 46 © 2006 by Digeo, Inc. All rights reserved.
Using and programming the remote This chapter provides information about remote functions and programming. Functions of the Moxi remote The Moxi remote operates the media center, and—once programmed—will simultaneously control the power, volume, and mute functions of your TV or audio receiver. Your cable operator may supply a different remote. If your remote does not look like the one pictured in figure 39 on page 43, refer to the information provided with that remote for programming instructions.
all DVRs were not created equal * locks and unlocks SuperTicker items ticker displays and hides SuperTicker power turns the TV and audio receiver on and off on demand jumps to the On Demand category live TV jumps to full-screen live TV play starts a recorded program, song, or album rew multi-speed rewind for playback (press multiple times to select speed) fwd multi-speed fast forward for playback (press multiple times to select the speed) rec starts a recording stop stops a program, song, or album pause pa
Using and programming the remote Programming the remote Before you begin, find the codes for your TV from the table starting on page 78. Write it here: ____________________________________________________________ Programming with codes Follow these steps to program the remote to control TV power and volume. Some older devices may not be supported. If the device fails to respond to any code, use its original remote to control it. ____________________________________________________________ 1.
Using and programming the remote all DVRs were not created equal Programming by search 4. If the TV or audio device is not listed, or the codes listed do not work, try programming by search. Programming by search allows the remote to cycle through codes to find one that works with the TV or audio device. Once programmed with two device codes, the remote controls volume and mute for the second device. Follow these steps to program the remote to control audio device power and volume. 5.
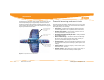
Using and programming the remote Infrared emitter When a button on the remote is pressed, the infrared signal is sent to an IR receiver. The receiver then transmits the signal to the IR emitter (IR blaster), which sends commands to electronic components. For the IR emitter to send its signals to the media center, it must have a clear view of the infrared receiver on the front panel of the media center.
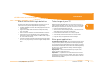
5 Adding additional recording space Using an external hard drive .............................................................................. 48 Archiving simplified ........................................................................................... 49 Archiving to a VCR or DVCR .............................................................................. 50 © 2006 by Digeo, Inc. All rights reserved.
Adding additional recording space This chapter describes how to connect an external hard drive, VCR, or other recording device, to add additional drive space or archive shows recorded on the media center. If you have the External Hard Drive card in the Settings category, continue to Using an external hard drive below. Otherwise, skip to Archiving simplified on page 49. • Connecting an external hard drive 1. Connect an external hard drive to a USB 2.0 port on the rear of the media center.
all DVRs were not created equal Disconnecting an external hard drive If an connected external hard drive is disconnected while it is in use (a recording is playing or a program is being recorded) recordings stored on it may become corrupted. To disconnect the external hard drive: 1. Manually stop all recordings by selecting the program card in the Moxi Menu, and then choosing stop recording. 2. In the Settings category, select the External Hard Drive card. 3. Select disconnect and press OK. 4.
Adding additional recording space When selecting the connections, consider the video resolution. • If you plan to record HD programming to the VCR, use a connection that supports 720p and 1080i. • If you plan to record in standard definition (480i), use any video connection except the one used by the TV. See table 3 for the resolutions supported by each connection.
Adding additional recording space all DVRs were not created equal 3. Connect another set of audio and video cables between the VCR and the TV. 4. Play the recorded program while recording with the VCR. There are three types of IEEE 1394 connectors: 6-pin powered Main TV (rear view) 4-pin unpowered (used on media center) 4-pin (used on many digital media devices) 5 A cable with a 6-pin connector works in the larger 4-pin port but does not supply power to the secondary device.
Adding additional recording space 52 Media Center User Guide © 2006 by Digeo, Inc. All rights reserved.
6 Enabling PC Link System requirements ......................................................................................... 54 Connecting to the network ................................................................................ 54 Setting up your computer .................................................................................. 54 Playing shared music or photos .......................................................................... 57 © 2006 by Digeo, Inc. All rights reserved.
Enabling PC Link This chapter details how to share photos and unencrypted MP3 files from networked computers with your media center. PC Link is an optional feature not available in all areas. Connecting to the network If the media center is not yet connected to the home network, see Connecting to the home network on page 66. To enable PC Link: PC Link connects your media center to computers on your home network.
Enabling PC Link all DVRs were not created equal Using Windows Media Player 11 If you have Windows Vista then Windows Media Player 11 is already installed on your PC. Skip to Sharing with Windows Media Player 11. If you have Windows XP see Installing Windows Media Player 11 below.
Enabling PC Link Using Windows Media Connect Windows Media Connect is not available for Microsoft Vista. 3. Click Next, and then choose which folders to share with the Moxi Media Center. 4. Click Finish. Windows Media Connect minimizes itself to the taskbar and begins indexing the shared folders. A balloon pops up from the toolbar alerting you that the computer is now sharing available media. If you are sharing a large number of files, it may take several minutes for the balloon to appear.
Enabling PC Link all DVRs were not created equal Playing shared music or photos To play shared music, go to the Jukebox category. For shared photos, go to the Photos category. See Using Photos on page 20 for more information on photos. 6 Scroll vertically to the photo, song, album, or playlist with the link icon and select it to play the media. See Using Jukebox on page 23 for more information on Jukebox.
Enabling PC Link 58 Media Center User Guide © 2006 by Digeo, Inc. All rights reserved.
7 Getting connected Before connecting ............................................................................................. Ventilation requirements.................................................................................... Media center information .................................................................................. Media center illustrations................................................................................... Moxi Mate information ...............................
Getting connected This chapter details connecting the set-top box to your TV and other home media equipment. Ventilation requirements Before connecting To prevent overheating, allow adequate ventilation and airflow around the media center. The media center requires at least a two-inch (5 cm) clearance on top and all sides with airflow to the or rear.
Getting connected all DVRs were not created equal Media center information Media center illustrations Moxi Media Center features: The following illustrations of the media center show the front and rear panels and connections. Your model may differ slightly.
Getting connected Moxi Mate information Moxi Mate illustrations Standard features include: • Shared dual cable tuners, DVR, and CD/DVD drive with the media center • Standard RF and Composite video with stereo audio outputs • Front panel clock display and control buttons Controls POWER LIVE TV MENU CHANNEL 10:35 Time OK Power Indicator Navigation Figure 49: Moxi Mate front panel RF connections Composite Video OUT CABLE IN TO TV R L POWER V Stereo Audio Figure 50: Moxi Mate rear pan
Getting connected all DVRs were not created equal Table 4: Video cables, starting with highest quality connection Connector shapes Y PB PR V 7 Cable type Description DVI-D A digital video connection capable of displaying 480i, 480p, 720p, and 1080i video resolutions from the media center. If 480i is not selected in HDTV Setup, video in 480i is automatically converted to 480p.
Getting connected Table 5: Audio cables starting with highest quality connection Connector shapes L R 64 Media Center User Guide Cable type Description S/PDIF (coaxial) A digital audio connection that carries high-quality Dolby Digital audio. S/PDIF (optical) A digital audio connection that carries high-quality Dolby Digital audio. RCA An analog stereo audio connection. © 2006 by Digeo, Inc. All rights reserved.
Getting connected all DVRs were not created equal Connecting to the TV and receiver 3. The media center supports multiple types of audio and video connections. It is recommended that you use the highest-quality connection supported by both the TV or audio receiver and the media center. ! Install one of the following audio connections: a. For digital audio, connect an S/PDIF cable to the media center and receiver or TV. b.
Getting connected 2d Connecting to the home network Composite audio/video TV 3c Receiver S-Video 1 Stereo Audio 2c To enable PC Link, the media center needs a full-time connection to your home network. The connection can be wired (see below) or wireless (see Wireless data connection on page 67), although a wired connection is preferred.
Getting connected all DVRs were not created equal Wireless data connection Adding components If a wired connection is not possible, connect the media center to a wireless game adapter or wireless bridge manufactured by the same company as your wireless router, see figure 54. An Internet connection is not required for PC Link. To add components to the TV connected to the media center, such as a DVD player or VCR, refer to the manufacturer’s documentation for each device.
Getting connected 68 Media Center User Guide © 2006 by Digeo, Inc. All rights reserved.
all DVRs were not created equal Getting connected . 7 The next steps • • • • See Using Moxi on page 7 to learn more about the Moxi Menu. To set up PC Link, see Enabling PC Link on page 53. For help, see Troubleshooting on page 71. Do you have a specific question? Use the Glossary on page 93 and Index on page 97 to find the answer. © 2006 by Digeo, Inc. All rights reserved.
Getting connected 70 Media Center User Guide © 2006 by Digeo, Inc. All rights reserved.
8 Troubleshooting Media center troubleshooting............................................................................ 72 Moxi Mate troubleshooting ............................................................................... 73 © 2006 by Digeo, Inc. All rights reserved.
Troubleshooting This chapter contains troubleshooting information for basic issues related to your media center or Moxi Mate. If these tips do not resolve the issue, contact your service provider for further assistance. Media center troubleshooting This section addresses issues related to the media center. Audio and video problems The following procedures address connectivity and configuration issues between the cable drop, TV, and the media center. Static on screen or poor picture quality 1.
Troubleshooting all DVRs were not created equal Remote or front panel control problems Moxi Mate troubleshooting If you cannot control the media center with the front panel buttons: This section provides troubleshooting tips for basic issues related to the Moxi Mate. If you cannot resolve the issue, contact your service provider. • Try using the Moxi remote. If it works, call customer service for a replacement media center.
Troubleshooting Audio and video problems The following items address connectivity and configuration issues between the TV and the media center or Moxi Mate. • Make sure the media center, Moxi Mate, and the TV to which the Moxi Mate is connected are plugged in and turned on. • Make sure the TV connected to the media center or Moxi Mate is set to the correct channel (usually 3 or 4) or input setting, and that the sound is not muted.
Troubleshooting all DVRs were not created equal If that does not correct the problem, do the following: 1. At the computer, click Start, and then Run. 2. Type 3. In the command window, type then press Enter. 4. Type ipconfig /dnsflush, and then press Enter. 5. Type ipconfig /renew, and then press Enter. 6. In Windows Media Connect, click the Settings icon. If sharing is enabled, click the stop button. 7. Click the start button to begin sharing. 8.
Troubleshooting 76 Media Center User Guide © 2006 by Digeo, Inc. All rights reserved.
9 Moxi remote programming codes TV Codes ........................................................................................................... 78 Audio device codes............................................................................................ 85 © 2006 by Digeo, Inc. All rights reserved.
Moxi remote programming codes This chapter provides a listing of all programmable TV and audio device codes stored in the Moxi remote. See Using and programming the remote on page 41 for more information. TV Code TV Codes Apex Digital 0148, 0879, 0748, 0890 Use the codes in table 6 to program the remote for your TV.
Moxi remote programming codes all DVRs were not created equal Table 6: TV codes (Continued) Table 6: TV codes (Continued) TV Code TV Code Celebrity 0000 CXC 0180 Celera 0148 Daewoo 0092, 1909, 1661, 0661, 0032, 0066, 0067, 0672 Changhong 0148 Dell 1080, 1178 Citizen 0186, 0046, 0056, 0030, 0032, 0060, 0092, 0280,1909 Denon 0145, 0511 Dumont 0017 Clairtone 0185 Durabrand 1271, 1463, 0003, 1178, 0180, 1034 Clarion 0180 Dwin 0093, 0774 Colt 1906 Electroband 0000, 0185 Comme
Moxi remote programming codes Table 6: TV codes (Continued) 80 Table 6: TV codes (Continued) TV Code TV Code Fisher 0154 Harman/Kardon 0078, 0054 Fujitsu 0809, 0179, 0683, 0853 Harvard 0068, 0180 Funai 1271, 0180, 0179, 1271, 1904, 1944 Havermy 0093 Futuretech 0180 Helios 0865 Gateway 1755, 1032 Hello Kitty 1661 GE 0021, 0027, 0047, 0055, 1178, 0051, 0251, 1661, 0135, 0138, 0174, 0279, 0282, 1907, 1917, 1919, 1922 Himitsu 0180 Hisense 0748 Gibralter 0017, 0030 Hitachi 01
Moxi remote programming codes all DVRs were not created equal Table 6: TV codes (Continued) Table 6: TV codes (Continued) TV Code TV Code JBL 0054 LXI 0154, 0047, 0054, 0148, 1178 JCB 0000 Magnasonic 1913, 1909 Jensen 0050, 0761, 1933, 0150 Magnavox JVC 0053, 0731, 0036, 0160, 0036, 1923 0054, 0187, 1944, 0024, 0020, 1198, 1913, 0028, 0030, 0036, 0179, 0186, 0032, 0706, 1904, 1931 Kawasho 0158, 0308 Magnin 1907 KEC 0180 Marantz 0054, 1154, 0704, 0854, 0030, 0444 Kenwood 0030 M
Moxi remote programming codes Table 6: TV codes (Continued) 82 Table 6: TV codes (Continued) TV Code TV Code Monivision 0003, 0843 Panasonic Motorola 0055, 0093 0051, 0250, 0650, 0055, 1924, 0226, 1941, 1410, 1947, 0162, 0375, 1919, 1946 MTC 0060, 0030, 0185, 0056 Penney Multitech 0180, 0217 0047, 0060, 0030, 0021, 0027, 0135, 1178, 0001, 0051, 0032, 0309, 1926, 1919, 1907, 0148, 0149, 0138, 0110, 0032, 0003 NAD 0148, 1178 Philco 0020, 0028, 0030, 0054, 0302 NEC 0030, 0497, 1704, 00
Moxi remote programming codes all DVRs were not created equal Table 6: TV codes (Continued) Table 6: TV codes (Continued) TV Code TV Code Quasar 0051, 0055, 0250, 0165, 0219, 0650, 1919, 1924 Sears Radio-Shack 0165, 0180, 0030, 1178, 0032, 0154, 1904, 1920, 0047, 0056 0154, 0148, 1007, 0047, 0054, 0056, 0149, 0168, 1271, 1178, 0179, 0032, 1904, 1926 Sharp 0047, 0679, 1922, 0135, 1948, 1958, 0090, 0174, 1907, 1917, 1919 0093, 0165, 0491, 0153, 0851, 0032, 1917, 0036, 0220, 0032, 0398 Sharper
Moxi remote programming codes Table 6: TV codes (Continued) 84 Table 6: TV codes (Continued) TV Code TV Code Superscan 0864 Tera 0031 Supre-Macy 0046 Thomas 1904 Supreme 0000 TMK 0056, 0177, 1178 SVA 0587, 0748, 0865, 0871, 0872 TNCi 0017 Sylvania 0020, 0054, 1271, 0028, 1944, 0030, 0065, 0036, 1931, 1944 Toshiba 0148, 0149, 0060, 1704, 1918, 0650, 0832, 1164, 1178, 1918, 1935, 0036, 0154, 1918 Symphonic 1271, 1913, 0180, 1904 Tosonic 0185 Syntax 1144, 1178 Totevision 0032
Moxi remote programming codes all DVRs were not created equal Table 6: TV codes (Continued) TV Code Vidtech 0036, 1178 Viewsonic 0864, 0857, 0885, 1755 Viking 0046 Vizio 1032, 0864, 0885 Wards 0054, 0165, 1178, 0020, 0000, 0021, 0027, 0028, 0030, 0056, 0174, 0179, 0202 Waycon 0148 Westinghouse 0889, 0890 White Westinghouse 1909, 1463 Yamaha 0797, 0833, 0769, 0030, 0769 Zenith 0017, 1178, 1909, 1911, 0092, 1463, 1904, 1929 Zonda 0003 © 2006 by Digeo, Inc. All rights reserved.
Moxi remote programming codes Table 7: Audio device codes (Continued) 86 Table 7: Audio device codes (Continued) Audio device Code Audio device Code Arcam 4120 Classic 4352 AudioSource 3011 Coby 4263, 4389 Audiotronic 4189 Criterion 4420 Audiovox 4390, 4627 Curtis Mathes 3080, 3201, 3300 B&K 3840 Daewoo 4250 Bel Canto Design 4583, 4584 Dell 4383 Delphi 4414 Biamp 3582 Denon 3004, 3160, 3273, 3771, 4104, 4142, 4360 Bose 3639, 3674, 4229, 4253 3085 Brix 4602 Digital
Moxi remote programming codes all DVRs were not created equal Table 7: Audio device codes (Continued) Table 7: Audio device codes (Continued) Audio device Code Audio device Code Garrard 3146, 3281, 3424, 3440, 3463, 3744 JVC 3074, 3464, 4263, 4374, 4495, 4811 Gateway 4517, 4567 Kansai 3440 GE 3078, 3260 Kenwood Glory Horse 4263 3027, 3042, 3077, 3186, 3239, 3297, 3313, 3314, 3356, 4027, 4051, 4313, 4569, 4570 Go Video 4532 KLH 4390, 4412, 4428, 4664 GoldStar 3031 Koss 3255, 3424,
Moxi remote programming codes all DVRs were not created equal Table 7: Audio device codes (Continued) Table 7: Audio device codes (Continued) Audio device Code Audio device Code LXI 3181, 3744 Onkyo 3119, 3135, 3380, 3842, 4298, 4320, 4531 Magnavox 3128, 3189, 3195, 3204, 3222, 3364, 3269, 3391, 3531, 4089, 4189, 4269, 4514 Optimus Marantz 3006, 3039, 3128, 3189, 3269, 3321, 3412, 3892, 4089, 4189, 4269, 4289 3042, 3080, 3177, 3181, 3186, 3219, 3300, 3395, 3440, 3531, 3622, 3670, 3738, 3744,
Moxi remote programming codes all DVRs were not created equal Table 7: Audio device codes (Continued) Table 7: Audio device codes (Continued) Audio device Code Audio device Code Proscan 4254 Sharper Image 4263, 4556 Quasar 3039 Sherwood Radio-Shack 3744, 4263 3062, 3066, 3475, 3491, 3502, 3565, 4077, 4423, 4653 RCA 3054, 3080, 3300, 3346, 3360, 3530, 3531, 3823, 4023, 4074, 4154, 4254, 4390, 4511, 4609 Shinsonic 4426 Shure 3264 9 Realistic 3163, 3181, 3182, 3195, 3395 Sonic 3281
all DVRs were not created equal Moxi remote programming codes Table 7: Audio device codes (Continued) Audio device Code Teac 3163, 3387, 3463, 4074, 4267, 4390, 4528 Technics 3039, 3208, 3308, 3309, 3372, 3374, 3518, 3521, 4308, 4309, 4518 Techwood 3281, 3344, 3364 Thorens 4189 Toshiba 3353 Venturer 4390 Victor 3074, 3331 Wards 3013, 3054, 3078, 3080, 3158, 3189, 3211 Welton 3344 Yamaha 3081, 3082, 3133, 3143, 3176, 3186, 3354, 3504, 4176, 4276, 4331, 4375 Yorx 3195 © 2006 by Dige
10 Specifications Media center specifications................................................................................ 92 Moxi Mate specifications ................................................................................... 92 © 2006 by Digeo, Inc. All rights reserved.
Specifications 92 Media center specifications Moxi Mate specifications Table 8: Media center specifications Table 9: Moxi Mate specifications Feature Quantifier Feature Quantifier Power supply Line input voltage 95 V to 125 V AC; frequency 57 Hz to 63 Hz Power supply Line input voltage 95 VAC to 125 VAC; frequency 57 Hz to 63 Hz USB power (front) Two USB 1.1 connectors, 5 V, 500 mA maximum combined current Operating temperature 15°C to 65°C Dimensions (WxHxD) 10.
Glossary all DVRs were not created equal Glossary 11 component: A composite video connection Numerics A 1080i 1080 alternating interlaced lines is the action menu: Provides provides different most common HD standard with the greatest line count, and available on almost all HD-ready and HDTV sets. action choices or commands. It appears in the Moxi Menu when a user decision is required.
Glossary HDTV: High Definition TV provides much bet- E ter resolution than TVs based on the NTSC standard of 480i. HDTVs typically show video at video resolutions of 720p and 1080i, often in addition to other resolutions. EDTV: Enhanced-definition describes a digital TV that is usually capable of displaying video in 480p. episode limit: The maximum number of episodes for the selected program that the media center will record.
Glossary all DVRs were not created equal Moxi Menu: A user interface through which player bar: A horizontal graphic that ap- consumers can explore and access live or recorded TV programming, digital music, photos, and games using a remote control. P pears in the lower part of the screen whenever you press a playback control. The bar provides information about the viewing location within the current program. playlist: In Jukebox, after creating a queue, you may save it as a playlist.
Glossary subnet: A subnet is a portion of a larger network. For PC Link, all linked devices must be on the same subnet - IP addresses are the same except for the last number (192.168.2.2 and 192.168.2.3, for example). U USB: Universal Serial Bus provides a serial bus standard for connecting devices. On the media center it is used to connect such devices as memory card readers and external hard drives. SuperTicker: A feature that provides access to additional content for news, weather, sports, and stocks.
Index all DVRs were not created equal Index 12 Numerics C 21 Frenzy, 27 card 10 background color, 16 Find & Record 12 program, 15 scheduled to record, 16 category 10 channels, 13, 30 favorites 13 games, 25 Jukebox, 23 Parental Controls, 35 CD, options, 35 channel list, 30 Closed Caption, 34 Code Breaker, 26 components, adding, 67 connecting home network, 66 A About Moxi 11 album, open, 21 archiving 48, 50 audio connections, 33 device codes 85 output, 33 secondary, 34 See also Moxi remote.
Index H M HDTV connections 31 setup, 23 home network troubleshooting, 74 MAC address 11 Mahjong, 26 media center connecting, 65 illustrations I icons, recording, 15 IEEE 1394, 50 infrared emitter (IR blaster), 46 installation secondary components, 67 Invasion Wave, 26 IP address 11 J Jukebox 4, 23 loading, 24 playing, 24 queue, creating, 24 N notes 4 O L letter box, setting, 32 live TV, watching, 3 locking. See also parental control.
Index all DVRs were not created equal PIN changing, creating, 35 resetting, 38 Ping, 27 playback controls, 14 See also Moxi remote player bar features of, 14 illustrated, 14 using the, 14 playlist creating, 22 with PC Link, 22 with photos, 22 priority changing, 18 setting 18 product illustrations media center, 61 Moxi Mate, 62 product specifications media center, 92 Moxi Mate, 92 Q queue, creating, 24 © 2006 by Digeo, Inc. All rights reserved.
Index V V-Chip, 37 ventilation 60 video connections supported, 31 Video Poker, 27 video resolutions, DVD, 23 W wide mode, 32 widescreen, settings, 32 Windows Media Connect 55, 56 See also PC Link. 100 Media Center User Guide © 2006 by Digeo, Inc. All rights reserved.
all DVRs were not created equal January 2007