
User Manual

- 4 -
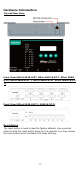
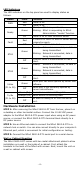
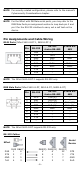
LED Indicators
The LED indicators on the top panel are used to display status as
follows:
Name
Color
Function
PWR
Red
Power is on.
Off
Power is off.
Ready
Green
Steady:
NPort is operational
Blinking:
NPort is responding to NPort
Administrator “Locate” function
Off
Power is off or fault condition exists.
Fault
Red
IP conflict or DHCP or BOOTP server did not
respond properly.
Off
No fault condition detected.
ETH1
Green
Steady:
Network is connected, no data is
being transmitted.
Blinking:
Network is connected, data is
being transmitted.
Off
Ethernet cable is disconnected or has a
short.
ETH2
Green
Steady:
Network is connected, no data is
being transmitted.
Blinking:
Network is connected, data is
being transmitted.
Off
Ethernet cable is disconnected or has a
short.
InUse
(P1 to P8)
Green
Serial port has been opened by server side
software.
Off
Serial port is not currently opened by
server side software.
Tx/Rx
(P1 to P8)
Green (Tx)
Serial device is transmitting data.
Orange (Rx)
Serial device is receiving data.
Off
No data is flowing to or from the serial
port.
Hardware Installation
STEP 1: After removing the NPort 5600-8-DT from the box, place it on
a desktop or other horizontal surface. Connect the 12-48 VDC power
adaptor to the NPort 5600-8-DT’s power input when using an AC power
source, or connect the NPort 5600-8-DT’s terminal block directly to a
DC power source.
STEP 2: Use an Ethernet cable to connect the NPort 5600-8-DT to a
network hub or switch. You can also connect directly to your computer’s
Ethernet port, which is convenient for initial configuration or testing.
STEP 3: Connect the NPort 5600-8-DT’s serial port to a serial device.
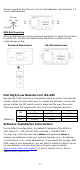
Wall or Cabinet Mounting
The NPort 5600-8-DT comes with two metal attachment plates to allow
installation on a wall or the inside of a cabinet. First, attach the
brackets to the back of the NPort with screws. Next, mount the unit on
a wall or cabinet with screws.