
Installation Guide
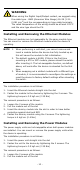

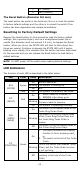
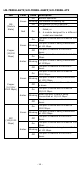
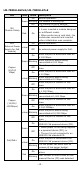
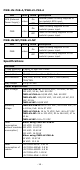
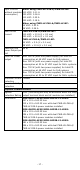
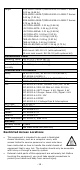
Table Of Contents
- MDS-G4000-4XGS/ MDS-G4000-L3-4XGS Series Quick Installation Guide
- Package Checklist
- Default Settings
- Panel Layouts
- Dimensions
- Ethernet Modules (Hardware Rev.2.0.0 and above)
- Power Modules (Hardware Rev.2.1.0 and above)
- DIN-rail Dimension and Instructions
- Wall Mount Dimension and Instructions (Optional: WK-112-01)
- Rack-mounting Kit Dimensions and Instructions (Optional: RK-3U-02)
- Matters That Require Attention
- Connecting the Power Inputs
- Power Terminal Blocks
- PoE Power Terminal Blocks
- Wiring the Relay Contact
- Digital Input/Output
- Installing and Removing the Ethernet Modules
- Installing and Removing the Power Modules
- Grounding the Moxa Industrial DIN-rail Switch
- RS-232 with RJ45 Interface Console Connection
- USB Storage Connection
- Resetting to Factory Default Settings
- LED Indicators
- Specifications
- Restricted Access Locations

- 11 -
3. Insert the dummy module into the slot in order to have better
protection against dust and EMI.
4. Fasten the dummy module using the 2 screws. The tightening
torque is 4 kgf-cm (0.4 Nm)
NOTE
If one of the modules is removed from the device, it is
recommended
to insert a dummy module in order to provide
better protection against dust and EMI.
Grounding the Moxa Industrial DIN-rail Switch
Grounding and wire routing help limit the effects of noise due to
electromagnetic interference (EMI). Run the ground connection from
the ground screw to the grounding surface prior to connecting devices.
ATTENTION
T
his product is intended to be mounted to a well-grounded
mounting surface, such as a metal panel. We use the
green-
and
-yellow cable type AWG (American Wire Gauge) min. 16
(1.31 mm
2
) for grounding.
NOTE
The PoE power connection is for indoor and local area network
usage only.
NOTE
Using a shielded cable achieves better electromagnetic
resistance.
RS-232 with RJ45 Interface Console Connection
The switch has an RS-232 serial console with an RJ45 interface. Please
use a Moxa 9-pin female console cable to connect to your PC's COM
port (or via USB-to-Serial converters or hubs). You can then use a
console terminal program, such as Moxa’s PComm Terminal Emulator,
to access the console configuration utility of the switch.
RS-232 Setup:
• Baud rate: 115,200
• Data Bits: 8
• Parity: None
• Stop Bits: 1
• Terminal Type: VT100
USB Storage Connection
Use Moxa’s ABC-02-USB automatic backup configurator to connect to
the USB storage port (Type A connector; see the diagram below for
pinout assignments) to perform configuration backup, firmware
upgrade, or system log file backup.
Pin
Description
1
VCC (+5V)
2
D- (Data-)