
User Manual


ioThinx 4510 Series Hardware Installation
3-6
CAUTION
Be sure to
note the maximum possible current for each power wire and common wire. Observe all electrical
codes dictating the maximum current allowable for each wire size. If currents exceed the maximum rating
,
the
wires will overheat
, which could cause serious damage to your
equipment. For safety reasons, we recommend
using 2
mm diameter wire to connect to the power supply (e.g., 12 AWG).
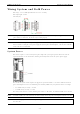
Mounting the Unit
In this section, we describe how to mount the device on a DIN rail and how to unmount the device from a DIN
rail.
DANGER
Never install the device while the power source is switched on
.
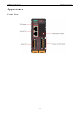
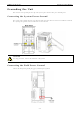
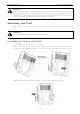
Installing the Unit on a DIN Rail
Take the following steps to install the unit on a DIN rail.
Step 1: Hook the mounting clip of the unit onto the DIN rail, and then lower the clip onto the DIN rail. At least
55 mm of space above the DIN rail should be kept free to ensure that the installation can be done correctly.
Step 2: Push the unit towards the DIN rail until the end of the mounting clip snaps into place.