
User`s manual


EDR-G903/G902 Getting Started
2-5
Perform the following steps to access the console utility via Telnet.
1. Click Start ( Run, and then telnet to the EtherDevice Router’s IP address from the Windows Run window.
(You may also issue the telnet command from the MS-DOS prompt.).
2. Refer to instructions 6 and 7 in the RS-232 Console Configuration (115200, None, 8, 1, VT100) section
on page 2-3.
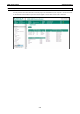
Using a Web Browser to Configure the
EtherDevice Router
The EtherDevice Router’s web browser interface provides a convenient way to modify the switch’s configuration
and access the built-in monitoring and network administration functions. The recommended web browser is
Microsoft Internet Explorer 6.0 with JVM (Java Virtual Machine) installed.
NOTE
To use the EtherDevice Router’
s management and monitoring functions from a PC host connected to the same
LAN as the EtherDevice Router, you must make sure that the PC host and the EtherDevice Router are
connected to the same logical subnet.
NOTE
Before accessing the EtherDevice Router’s web browser, first connect the EtherDevice Router’
s RJ45 Ethernet
LAN ports to your Ethernet LAN, or directly to your PC’s Ethernet card (NIC). You can use either a
straight-through or cross-over Ethernet cable.
NOTE The EtherDevice Router’s default LAN IP address is 192.168.127.254.
Perform the following steps to access the EtherDevice Router’s web browser interface.
1. Start Internet Explorer and type the EtherDevice Router’s LAN IP address in the Address field. Press
Enter to establish the connection.
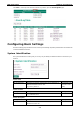
2. The web login page will open. Select the login account (Admin or User) and enter the Password (this
is the same as the Console password), and then click Login to continue. Leave the Password field blank
if a password has not been set.