
User`s manual


CP-134U Series User’s Manual Software Installation
3-29
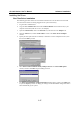
13. Click on OK in the Port X window to accept the port settings, and then click on OK in the
Property window to complete port settings and return to the MOXA Smartio/Industio
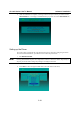
Configuration Panel window. The CP-168U board will now appear in the MOXA
Smartio/Industio Configuration Panel window, as shown below.
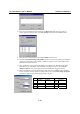
14. Click on OK in the MOXA Smartio/Industio Configuration Panel to return to the Network
window, and then click on OK to exit the Network window.
15. Restart the PC.
NOTE
The driver configuration will NOT take effect until you restart the PC.
NOTE
Double check that all CP-168U board components are connected and fastened tightly to ensure
that the system and the driver can start up successfully.
Once the system restarts, you may check the event log issued by the MOXA driver to see if the
board’s ports have been initialized successfully.
Enter the Administrative group, click the Event Viewer icon, and then select Log and System to
check for a message similar to “MOXA CP-168U board, with first serial port COM3, has been
enabled” for each newly configured board.
NOTE
If an error message similar to “Cannot find any configured MOXA Smartio/Industio series
board!” pops up, refer to the Troubleshooting chapter for possible solutions.
Once the board and the driver are installed and the driver restarts successfully, you can begin to
develop applications with the PComm library (see “Serial Programming Tools”) or the Microsoft
Win32 API. You can also use applications such as Terminal Emulator (see “Serial Programming
Tools”), a PComm utility, or HyperTerminal, to transmit/receive data, as well as Remote Access
Service to provide dial-up networking capabilities.
Configuring the Board and Ports
Re-Configuring Port Settings
If the driver is already installed, and you only wish to re-configure the ports, refer to the following
procedures. In addition to the procedures listed below, you may also click on Start Æ Programs
Æ MOXA Utility Æ MOXA Smartio/Industio Configuration Panel Æ Property, and then
refer to the instructions in the previous section, “First Time Driver Installation.”
1. Open the Control Panel, click on the Network icon, and select the Adapters tab.