
User Manual

- 7 -
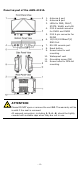
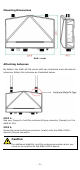
ATTENTION
To avoid environmental vibration or shock, you can consider a
robust installation with
four bigger screws, where
the shafts are
between 7.0 mm and 8.5 mm in diameter, and fix the
AWK-4131A directly onto the wall and tighten the screws.
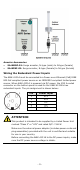
DIN-Rail Mounting (Optional)
The DK
-DC50131 die-cast metal kit, which
can be bought separately
, enables
easy and
robust installation for the
AWK-4131A.
A pair
of DK
-DC50131s is needed to DIN-r
ail mount
the AWK
-4131A. To install the DIN-rail
mounting ki
ts, tightly attach the two DIN-r
ail
mounting kits on
to the rear panel of the
AWK
-4131A using 6 screws for each kit.
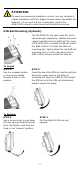
To Install
STEP 1:
Use the recessed button
on the spring
-loaded
bracket to lock it into
position.
STEP 2:
Insert the top of the DIN rail into the slot just
b
elow the upper hook of the DIN-rail
mounting kit. Push the
AWK-4131A toward
the DIN r
ail until the DIN-rail attachment
bracket snaps into place.
To Release
STEP 1:
Use a screw driver to p
ull down
the
two spring-loaded brackets
from
the bottom until they are
fixed in the “release” position.
STEP 2:
Pull the
AWK-4131A out and
upward.