
User Manual

- 6 -
ATTENTION
Use the
correct antennas: Use the 2.4 GHz antenna if the
AWK
-4131A will operate in IEEE 802.11b/g/n. Use the 5GHz
antenna
for operations in IEEE802.11a/n. Make sure the
antenna
s are installed in a safe outdoor area and are protected
against lightning and surge current using
surge protection
systems.
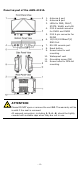
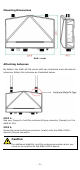
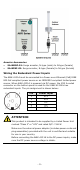
Wall Mounting
In most applications, wall mount provides an easier installation. You will
find it quite easy to mount AWK-4131A on the wall, as illustrated below.
STEP 1:
Attach the wall
-mounting kit
with M4 screws, as shown in
the dia
gram below.
STEP 2:
Mounting the
AWK-4131A on the wall
requires 4 screws. Use the
AWK-
4131A
device, with wall
-mounting kit
attached, as a guide to mark the correct
locations of the 4 screws. The heads of
the screws are recommended to be
between 5.5 mm and 8.5 mm in
diameter, and the
shafts should
not
be
more than 5.0
mm in diameter, as
shown in the figure.
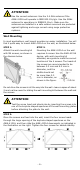
Do not drive the screws in all the way into the wall—leave a space of about
2 mm to allow room for sliding the wall-mounting kit between the wall and
the screws.
ATTENTION
T
est the screw head and shank size by inserting the screws
into
one of the keyhole shaped apertures of the wall
-
mounting plates
before attaching the plate to the wall.
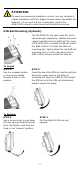
STEP 3:
Once the screws are fixed into the wall, insert the four screw heads
through the large opening of the keyhole-shaped apertures on the
AWK-4131A, and then slide the AWK-4131A downwards, as indicated in
the illustration on the right. Tighten the four screws for added stability.
⇒