UPort 1100 Series User’s Manual Second Edition, January 2008 www.moxa.com/product Moxa Inc. Tel: +886-2-8919-1230 Fax: +886-2-8919-1231 Web: www.moxa.com MOXA Technical Support support@moxa.com Worldwide: support@usa.moxa.
UPort 1100 Series User’s Manual The software described in this manual is furnished under a license agreement and may be used only in accordance with the terms of that agreement. Copyright Notice Copyright © 2008 Moxa Inc. All rights reserved. Reproduction without permission is prohibited. Trademarks MOXA is a registered trademark of The Moxa Inc. All other trademarks or registered marks in this manual belong to their respective manufacturers.
Table of Contents Chapter 1 Introduction..............................................................................................1-1 Overview ............................................................................................................................ 1-2 Package Checklist .............................................................................................................. 1-2 Product Features......................................................................................
1 Chapter 1 Introduction The UPort 1100 Series of USB-to-serial adaptors provide an easy way to add COM ports to your computer. The UPort 1110 provides one RS-232 port, the UPort 1130 provides one RS-422/RS-485 port, and the UPort 1150 and UPort 1150I each provide one RS-232/422/485 port. As a plug and play USB device, the adaptors are perfect for mobile, instrumentation, and point-of sale applications.
UPort 1100 Series User’s Manual Introduction Overview The UPort 1110, UPort 1130, and UPort 1150/1150I are part of Moxa’s UPort line of USB-to-serial adaptors. The UPort line provides a range of easy-to-use solutions for adding COM ports through a PC’s USB port. Simply install the drivers, connect the UPort to your computer, plug in your serial devices, and you’re ready to go.
UPort 1100 Series User’s Manual Introduction Product Specifications USB Version Connector Speed Serial Interface No. of Ports RS-232 RS-422 RS-485 USB 1.1 (also compatible with USB 1.0 and 2.
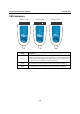
UPort 1100 Series User’s Manual Introduction LED Indicators UPort 1130 UPort 1110 UPort 1150 Active Active Active TxD TxD TxD RxD RxD RxD 1110 1130 USB-to-Serial Adaptor USB-to-Serial Adaptor 1150 RS-232/422/485 USB-to-Serial Adaptor Name Description Active This LED indicates normal operation. If the driver is installed correctly and the adaptor is plugged into a functioning USB port, the Active LED will light up and remain on.
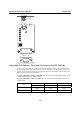
UPort 1100 Series User’s Manual 1K Introduction TR ON DIP 1 2 3 150 KX Adjustable Pull High/low, Terminator Resistors for the RS-485 Port In some critical environments, you may need to add termination resistors to prevent the reflection of serial signals. When using termination resistors, it is important to set the pull high/low resistors correctly so that the electrical signal is not corrupted. The UPort uses DIP switches to set the pull high/low resistor values for each serial port.
UPort 1100 Series User’s Manual Introduction ATTENTION Do not use the 1 KΩ setting on the UPort when using the RS-232 interface. Doing so will degrade the RS-232 signals and shorten the maximum allowed communication distance.
2 Chapter 2 Installation and Configuration Installation of the adaptor is a simple process. First install the driver, then plug the adaptor into a USB port. When the adaptor is plugged in, Windows will load the correct drivers for the adaptor and the new COM port. In this chapter, basic installation and configuration procedures are explained. Although the installation screens will be for Windows 2000, the procedures are essentially the same for Windows 98 and later versions.
UPort 1100 Series User’s Manual Installation and Configuration Initial Driver Installation The Documentation and Software CD will contain the drivers for the adaptor. You may also download the drivers at www.moxa.com. The installation procedure is the same for all Windows operating systems. Use Windows Explorer to locate the driver installation file, which will be Setup or Install. On the Documentation and Software CD, this file will be located in the UPort 1100/Software folder, filed by operating system.
UPort 1100 Series User’s Manual Installation and Configuration 3. Click Install to proceed with the installation. 4. A window will pop up cautioning you that this software has not passed Windows logo testing. This is a standard warning, and Moxa has thoroughly tested the driver for safe Windows operation. Please click STOP Installation to proceed.
UPort 1100 Series User’s Manual 5. Installation and Configuration Click Finish to complete the installation of the driver. Hardware Installation After installing the driver, plug the adaptor into any upstream USB port, such as a USB port on your computer. Windows will automatically detect the adaptor and begin installing the driver. When the Windows finishes installing the driver for the adaptor, it will then detect a new COM port, and will then install another driver for the new COM port.
UPort 1100 Series User’s Manual Installation and Configuration 2. Windows 98 users may skip to the next step. On Windows 2000 systems, a window will pop up cautioning you that this software has not passed Windows logo testing. This is a standard warning, and Moxa has thoroughly tested the driver for safe Windows operation. Please click Yes to proceed. 3. Windows will automatically detect and install the new serial port.
UPort 1100 Series User’s Manual Installation and Configuration 2. After a moment, the Found New Hardware Wizard will open. If you see the following screen, select No, not this time, then click Next. 3. On the next window that appears, select Install the software automatically (Recommended), then click Next.
UPort 1100 Series User’s Manual Installation and Configuration 4. The installation wizard will search for the correct drivers. After a moment, a window will pop up cautioning you that this software has not passed Windows logo testing. This is a standard warning, and Moxa has thoroughly tested the driver for safe Windows operation. Please click Continue Anyway to proceed. 5. Windows will spend a few moments installing the UPort driver. 6.
UPort 1100 Series User’s Manual Installation and Configuration 7. After Windows has completed installing the adaptor, it will automatically detect the new COM port. The Found New Hardware balloon will appear in the bottom right corner of the Windows desktop. 8. The Found New Hardware Wizard will open. If you see the following screen, select No, not this time, then click Next. 9. After a moment, the Found New Hardware Wizard will open.
UPort 1100 Series User’s Manual Installation and Configuration 10. The installation wizard will search for the correct drivers. After a moment, a window will pop up cautioning you that this software has not passed Windows logo testing. This is a standard warning, and Moxa has thoroughly tested the driver for safe Windows operation. Please click Continue Anyway to proceed. 11. Windows will spend a few moments installing the driver.
UPort 1100 Series User’s Manual Installation and Configuration 12. The next window indicates that Windows has completed the installation. Click Finish to proceed with installation procedure. 13. The Found New Hardware balloon will reappear, indicating that the installation was successful. Configuring the COM Port After the driver and hardware have been successfully installed, the new COM port will have a COM number and can be accessed and controlled just like your PC’s built-in COM ports.
UPort 1100 Series User’s Manual Installation and Configuration Configuring the Adaptor If you need to change the COM number that the adaptor assigns to the COM port, or adjust other advanced settings, you may go to Device Manager and right-click the UPort adaptor, which will be listed under Multi-port serial adaptors. In the context menu that pops up, you may select Properties in order to modify the COM port settings.
UPort 1100 Series User’s Manual Installation and Configuration In the Port Configuration tab, you will see the new COM port listed. Click Port Setting to modify the COM number and other parameters.
UPort 1100 Series User’s Manual Installation and Configuration ATTENTION Before modifying these settings, make sure that you have closed any applications that may be accessing the COM port, such as HyperTerminal. You may change the Port Number and enable or disable the Fast Flush function. For the UPort 1130, you may also select between RS-422, 2-wire RS-485, and 4-wire RS-485 modes. Please note that Auto Enumerating COM Number and Set the change to all ports are not available for this model of UPort.
UPort 1100 Series User’s Manual Installation and Configuration Removing the Adaptor The adaptor is a plug and play device. No special procedures are required to remove the adaptor; you may simply pull the adaptor out of the USB port. You should verify that no data is being transmitted before removing the adaptor. Removing the adaptor does not remove the drivers. The drivers remain in place so that the adaptor can be automatically detected and installed if it is pluged back into the USB port.
UPort 1100 Series User’s Manual Installation and Configuration 2-15
UPort 1100 Series User’s Manual Installation and Configuration Install Linux driver for UPort 1100 Series 1. Execute the following commands from the Linux prompt: #mount /dev/cdrom /mnt/cdrom #cd / #mkdir moxa #cd moxa #cp /mnt/cdrom// driv_linux2.6_uport1p_vx.x_build_xx.tgz #tar xvfz driv_linux2.6_uport1p_vx.x_build_xx.tgz 2. #cd mxu11x0/driver #make clean; make install 3.
3 Chapter 3 Pin Assignment UPort DB9 Pin Assignments The UPort 1100 series uses male DB9 connectors.