A.1.1.1.1.1.1. MOXA Multiport Board Windows XP Driver Installation Guide October, 2001 Moxa Technologies Co., Ltd. Tel: +866-2-8919-1230 Fax: +886-2-8919-1231 www.moxa.com service@moxa.com.
Table of Contents Automatic Installation - for C218T/PCI and C32010T/PCI only .......................... 2 Installing the C218T/PCI Multiport Board .............................................................2 Manual Installation ........................................................................................................ 5 Installing Moxa Multiport Board via Add New Hardware ......................................5 Installing the Multiport Board’s Serial Ports ..................................
We explain in this manual how to configure Moxa Multiport Boards to operate under the Windows XP operating system. The installation and configuration procedure is substantially different than for Windows NT/95/98/ME, but is quite similar to Windows 2000. Note that there are two different methods for installing Moxa Multiport Boards under Windows XP.
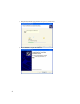
Automatic Installation - for C218T/PCI and C32010T/PCI only The examples in this section where produced using MOXA Intelligent C218T/PCI, which is an 8-port, RS-232/422/485 PCI Multiport Board for embedded systems. If you are installing an C32010T/PCI multiport board, the procedures you need to follow may be slightly different, but you should be able to use this as a guide to see how to install and manage your board. Installing the C218T/PCI Multiport Board 1.
. The Windows XP operating system will take a few seconds to search for the new hardware. 6. You may safely ignore any warnings from the operating system about compatibility with Whistler. Click on Continue Anyway to proceed.
7. Wait patiently while the appropriate files are copied to your hard drive. Moxa Intelligent C218T/PCI Series 8. Click on Finish to complete the installation.
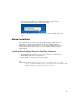
9. This completes the installation of your MOXA C218T/PCI. You should see the following message from the Windows XP operating system. Continue in the Multiport Board Properties section to learn how to manage your board’s ports. Manual Installation The examples in this section where produced using MOXA Smartio C168H, which is an 8-port, RS-232 or RS-422/485 ISA multiport board.
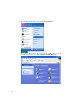
3. From the Windows XP desktop, click on Start à Control Panel. 4. [To work from “Classic View”, skip to step 6.] If your operating system is set to the new XP “Category View” style, click on Printers and Other Hardware.
5. Click on Add Hardware, found under the See Also options. 6. If your operating system is set to the older “Classic view” style, double click on the Control Panel’s Add Hardware icon.
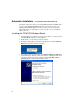
7. When the Welcome to the Add Hardware Wizard window opens, click on Next to continue with the installation process. 8. The Windows XP operating system will take a few seconds to search for new hardware. Keep in mind that it does not have the capability to locate ISA boards, so that at this stage of the installation process it will not be able to locate your Moxa ISA Multiport Board.
9. The next window to open reads: The following hardware is already installed on your computer. Click on the Add a new hardware device option to highlight it, and then click on Next to continue. 10. The next window to open reads: The wizard can help you install other hardware. Select the Install the hardware that I manually select from a list (Advanced) option, and then click on Next to continue.
11. The next window to open reads: From the list below, select the type of hardware you are installing. Click on the Multiport serial adapters option to highlight it, and then click on Next to continue. 12. The next window to open reads: Select the device driver you want to install for this hardware. If Moxa Technologies Inc.
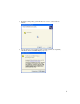
If the company name, Moxa Technologies Inc., is not listed, or you are unable to find the correct model name for the ISA Multiport Board you are installing, click on the Have Disk… button to continue. .NOTE: The rest of these instructions are written assuming you are using this second option. 13. The next window to open gives you the ability to easily select the location of your ISA Multiport Board’s driver files. The easiest way to proceed is to click on the Browse… button.
. Use the folder selection tool located to the right of Look in: to find the folder in which your ISA Multiport Board’s driver files are located. For this explanation, we copied the files into a folder located on the computer’s hard disk, although the more normal circumstance would be for the files to be located on either a floppy disk or CD. Use the left mouse button to click on the appropriate folder. 15. You should next see a window that shows two files: MXSER and MXSPORT.
17. Click on the correct model to highlight it—for this example, we installed MOXA Smartio C168 Series (ISA Bus)—and then click on Next to continue. 18. The next window to open reads: The wizard is ready to install your hardware. Click on Next to continue.
19. You may safely ignore any warnings from the operating system about compatibility with Whistler. Click on Continue Anyway to proceed. 20. A series of windows indicating the progress of the installation procedure will open and then close.
21. The next window verifies that the driver software for your ISA Multiport Board has been installed. Click on Finish to continue. Installing the Multiport Board’s Serial Ports 1. Once you have successfully installed your ISA Multiport Board, the Windows XP operating system will automatically detect the board’s ports, and then begin installing them—one by one. 2. You should see the following Found New Hardware message. Wait patiently.
3. When the Found New Hardware Wizard starts up, choose the option Install the software automatically (Recommended), and then click on Next to continue. For this example, we installed the driver software from a floppy disk located in the computer’s ‘a:’ drive. 4. Wait patiently while the software is copied to your hard drive. Note that it starts off installing MOXA Port 0.
5. The next window to open verifies that the software for MOXA Port 0 has been successfully installed. Click on Finish to complete the installation procedure. 6. For multiport boards, you will receive the Found New Hardware message, indicating that another communication port has been located. Follow the above procedure for installing this and subsequent ports. 7.
Multiport Board Properties Your Multiport Board’s configuration parameters are easily changed from within the Windows XP system’s device manager. 1. From the Windows XP desktop, click on Start à Control Panel. 2. [To work from “Classic View”, skip to step 4.] If your operating system is set to the new XP “Category View” style, click on Printers and Other Hardware.
3. To evoke the device manager, click on System, located under the See Also options.
4. If your operating system is set to the older “Classic View” style, double click on the Control Panel’s System icon. 5. The Windows XP System Properties window opens next.
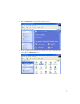
6. Select the Hardware tab, and then click on Device Manager…. 7. Click on the plus sign to the left of Multi-port serial adapters and then double click on MOXA [Multiport Board installed] (eg., Intelligent CP-204J Series) to open the Properties window.
General Information on the General page gives basic details about the Multiport Board and its current status. Configuration Select the Properties window’s Ports Configuration tab to change parameter settings for your Multiport Board. 1. 22 To change settings for a port, click on the port to highlight it (such as Port 1, as shown below), and then click on the Port Setting button.
2. This allows you to make changes to Port Number, UART FIFO, and Transmission Mode. Driver The Driver page displays important information about the driver. Use the buttons at the bottom of the window for Driver Details…, to Uninstall the driver, or Update Driver.
Resources The Resources page displays information about I/O Range, Memory Range, and IRQ. Port Configuration In this section, we describe how to access and modify certain port settings. 1. From the Device Manager window, click on the plus sign to the left of Ports (COM & LPT), and then double click on one of the MOXA Communication Ports listed.
2. The MOXA Communication Port 1 (COM 12) Properties page opens. 3. Click on the Port Settings tab to view and/or make changes to Baud Rate, Data bits, Parity, Stop bits, and Flow control.