
User`s manual


Moxa Managed DSL Ethernet Extender Getting Started
2-4
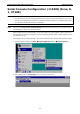
6. The serial console will prompt you to log in. Press Enter and select admin or user. Use the down arrow key
on your keyboard to select the Password field and enter a password if desired. This password will be
required to access any of the consoles (web, serial, Telnet). If you do not wish to create a password, leave
the Password field blank and press Enter.
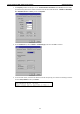
7. The Main Menu of the Moxa DSL Ethernet extender’s serial console should appear. (In PComm Terminal
Emulator, you can adjust the font by selecting Font… from the Edit menu.)
8. Use the following keys on your keyboard to navigate through the Moxa DSL Ethernet extender’s serial
console:
Key Function
Up, down, right, left arrow keys,Tab Move the onscreen cursor
Enter Display and select options
Space Toggle options
Esc Previous menu
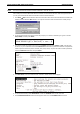
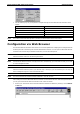
Configuration via Telnet Console
Opening the Moxa DSL Ethernet extender’s Telnet or web console over a network requires that the PC host and
the Moxa DSL Ethernet extender are on the same logical subnet. You may need to adjust your PC host’s IP
address and subnet mask. By default, the Moxa DSL Ethernet extender’s IP address is 192.168.127.253 and
the subnet mask is 255.255.255.0 (referred to as a Class B network). Your PC’s IP address must be set to
192.168.xxx.xxx if the subnet mask is 255.255.0.0, or to 192.168.127.xxx if the subnet mask is
255.255.255.0.
NOTE
To connect to the Moxa DSL Ethernet extender’s Telnet
or web console, your PC host and the Moxa DSL
Ethernet extender must be on the same logical subnet.
NOTE
When connecting to the Moxa DSL Ethernet extender’s Telnet or web console, first connect one of the Moxa DSL
Ethernet extender’s Ethernet ports to your Ethernet LAN, or directly to your PC’s Ethernet port. You may use
either a straight
-through or a cross-over Ethernet cable.