
User`s manual


Moxa Managed DSL Ethernet Extender Getting Started
2-6
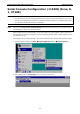
7. Use the following keys on your keyboard to navigate through the Moxa DSL Ethernet extender’s Telnet
console:
Key Function
Up, down, right, left arrow keys, Tab Move the onscreen cursor
Enter Display and select options
Space Toggle options
Esc Previous menu
NOTE
The Telnet console looks and operates in precisely the same manner as the serial console.
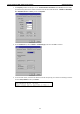
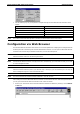
Configuration via Web Browser
The Moxa DSL Ethernet extender’s web console is a convenient platform for modifying device configuration and
accessing the built-in monitoring and network administration functions. You can open the Moxa DSL Ethernet
extender’s web console using a standard web browser, such as Internet Explorer.
NOTE
To connect to the Moxa DSL Ethernet extender’s Telnet or web console, your PC host and the Moxa DSL
Ethernet extender must be on the same logical subnet.
NOTE
If the Moxa DSL Ethernet extender is configured for other VLAN settings, you must make sure that your PC host
is on the management VLAN.
NOTE
When connecting to the Moxa DSL Ethernet extender’s Telnet or web console, first connect one of the Moxa DSL
Ethernet extender’s Ethernet ports to your Ethernet LAN, or directly to your PC’s Ethernet port. You may use
either a straight
-through or a cross-over Ethernet cable.
NOTE
The Moxa DSL Ethernet extender’s default IP address is 192.168.127.253.
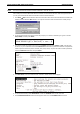
After making sure that the Moxa DSL Ethernet extender is connected to the same LAN and logical subnet as
your PC, open the Moxa DSL Ethernet extender’s web console as follows:
1. Connect your web browser to the Moxa DSL Ethernet extender’s IP address by entering it in the Address
or URL field.