Moxa Managed DSL Ethernet Extender User’s Manual First Edition, March 2013 www.moxa.com/product © 2013 Moxa Inc. All rights reserved.
Moxa Managed DSL Ethernet Extender User’s Manual The software described in this manual is furnished under a license agreement and may be used only in accordance with the terms of that agreement. Copyright Notice © 2013 Moxa Inc. All rights reserved. Trademarks The MOXA logo is a registered trademark of Moxa Inc. All other trademarks or registered marks in this manual belong to their respective manufacturers.
Table of Contents 1. About this Manual ............................................................................................................................. 1-1 2. Getting Started.................................................................................................................................. 2-1 Serial Console Configuration (115200, None, 8, 1, VT100) ....................................................................... 2-2 Configuration via Telnet Console .....................
1 1. About this Manual Thank you for purchasing Moxa’s managed DSL Ethernet extender. Read this user’s manual to learn how to connect your DSL Ethernet extender to Ethernet-enabled devices in industrial applications. The following two chapters are covered in this user manual: Getting Started This chapter explains the initial installation process for the DSL Ethernet extender. There are three ways to access configuration settings: serial console, Telnet console, and web console.
2 2. Getting Started This chapter explains how to install a Moxa DSL Ethernet extender for the first time. There are three ways to access the configuration settings: serial console, Telnet console, and web console. If you do not know the DSL Ethernet extender’s IP address, you can open the serial console by connecting the DSL Ethernet extender to a PC’s COM port with a short serial cable. You can open the Telnet or web console over an Ethernet LAN or over the Internet.
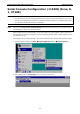
Moxa Managed DSL Ethernet Extender Getting Started Serial Console Configuration (115200, None, 8, 1, VT100) NOTE • You cannot connect to the serial and Telnet console at the same time. • You can connect to the web console and another console (serial or Telnet) at the same time. However, we strongly recommend that you do NOT do so. Following this advice will allow you to maintain better control over the Moxa DSL Ethernet extender’s configuration.
Moxa Managed DSL Ethernet Extender Getting Started 3. The Property window should open. On the Communication Parameter tab for Ports, select the COM port that is being used for the console connection. Set the other fields as follows: 115200 for Baud Rate, 8 for Data Bits, None for Parity, and 1 for Stop Bits. 4. On the Terminal tab, select VT100 for Terminal Type, and then click OK to continue. 5. In the terminal window, the Moxa DSL Ethernet extender will prompt you to select a terminal type.
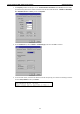
Moxa Managed DSL Ethernet Extender Getting Started 6. The serial console will prompt you to log in. Press Enter and select admin or user. Use the down arrow key on your keyboard to select the Password field and enter a password if desired. This password will be required to access any of the consoles (web, serial, Telnet). If you do not wish to create a password, leave the Password field blank and press Enter. 7. The Main Menu of the Moxa DSL Ethernet extender’s serial console should appear.
Moxa Managed DSL Ethernet Extender NOTE Getting Started The Moxa DSL Ethernet extender’s default IP address is 192.168.127.253. After making sure that the Moxa DSL Ethernet extender is connected to the same LAN and logical subnet as your PC, open the Moxa DSL Ethernet extender’s Telnet console as follows: 1. Click Start Run from the Windows Start menu and then Telnet to the Moxa DSL Ethernet extender’s IP address from the Windows Run window. You may also issue the Telnet command from a DOS prompt. 2.
Moxa Managed DSL Ethernet Extender Getting Started 7. Use the following keys on your keyboard to navigate through the Moxa DSL Ethernet extender’s Telnet console: Key NOTE Function Up, down, right, left arrow keys, Tab Move the onscreen cursor Enter Display and select options Space Toggle options Esc Previous menu The Telnet console looks and operates in precisely the same manner as the serial console.
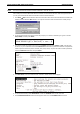
Moxa Managed DSL Ethernet Extender Getting Started 2. The Moxa DSL Ethernet extender’s web console will open, and you will be prompted to log in. Select the login account (admin or user) and enter the Password. This password will be required to access any of the consoles (web, serial, Telnet). If you do not wish to create a password, leave the Password field blank and press Enter. NOTE By default, no password is assigned to the Moxa DSL Ethernet extender’s web, serial, and Telnet consoles. 3.
3 3. Featured Functions In this chapter, we explain how to access the Moxa DSL Ethernet extender’s various configuration, monitoring, and administration functions. These functions can be accessed by serial, Telnet, or web console. The serial console can be used if you do not know the Moxa DSL Ethernet extender’s IP address and requires that you connect the Moxa DSL Ethernet extender to a PC COM port. The Telnet and web consoles can be opened over an Ethernet LAN or the Internet.
Moxa Managed DSL Ethernet Extender Featured Functions Product Overview MOXA’s IEX series are entry-level managed DSL Ethernet extenders that allow you to extend the point-to-point Ethernet connections over DSL technology in a cost-effective way. With the IEX series, networks can be set up without additional fiber upgrades or reconstruction by leveraging existing copper wiring resources. Compliant with G.SHDSL.bis and VDSL2 standards, the IEX-402-SHDSL series supports data rates of up to 15.
Moxa Managed DSL Ethernet Extender Featured Functions 1st DIP switch: CO/CPE Assignment The DSL Ethernet extenders need to work in pairs with one unit designated as a CO (central office) device and the other as a CPE (customer premise equipment) device. In addition to manual configuration by selecting the DIP switch settings (CO/CPE) on both devices, the IEX series can also perform automatic CO/CPE designation when both extenders are set as CO devices (all IEX series extenders are set as CO by default).
Moxa Managed DSL Ethernet Extender Featured Functions 3rd DIP Switch: Annex A/Annex B Assignment (IEX-402-SHDSL Series Only) Generally, DSL supports different band plans and modulations for transmission over POTS or ISDN. For point-to-point applications, the Annex A/Annex B selection refers to the cable type between DSL ports of both devices. If the cable is US-Type/0.5mm, please configure as ANNEX A. Otherwise, please set as default ANNEX B.
Moxa Managed DSL Ethernet Extender Featured Functions System Identification System Identification items are displayed at the top of the web console and will be included in alarm emails. You can configure the System Identification items to make it easier to identify different DSL Ethernet extenders that are connected to your network. DSL Ethernet Extender Name Setting Description Factory Default Max.
Moxa Managed DSL Ethernet Extender Featured Functions Web Auto-logout (S) Setting Description Factory Default 60 to 86400 (seconds) Disable or extend the auto-logout time for the web 0 (disabled) management console. Age Time (S) Setting Description 15 to 3825 (seconds) The length of time that a MAC address entry can remain in the 300 Factory Default Moxa DSL Ethernet extender.
Moxa Managed DSL Ethernet Extender Featured Functions Password Setting Description Factory Default Old password Enter the current password None (max. 16 characters) New password Enter the desired new password. Leave it blank if you want to None (Max. 16 characters) remove the password. Retype password Enter the desired new password again. Leave it blank if you (Max. 16 characters) want to remove the password.
Moxa Managed DSL Ethernet Extender Featured Functions Port Settings Ethernet Port Settings Port settings include port transmission speed, flow control, and port type (MDI or MDIX). Description Setting Description Factory Default Media type Displays the media type for each module’s port N/A Setting Description Factory Default Max. 63 characters Specifies an alias for the port to help administrators None Name differentiate between different ports.
Moxa Managed DSL Ethernet Extender Featured Functions DSL Port Settings DSL port settings provide the interface to configure the port transmission speed IEX-402-SHDSL Series Description Setting Description Factory Default Standard Display the standard of DSL port G.SHDSL.bis Name Setting Description Factory Default Max. 63 characters Specifies an alias for the port to help administrators None differentiate between different devices.
Moxa Managed DSL Ethernet Extender Featured Functions Annex Description Factory Default Display the ANNEX A/ANNEX B DIP switch configuration ANNEX B (EU) LED Status The DSL Ethernet extender can display two parameters types on the DSL SPEED/SNR LED indicator. One is the transmission speed and the other is the signal-to-noise ratio (SNR) of the connection.
Moxa Managed DSL Ethernet Extender • Featured Functions Symmetric speed: 100M/100M, 75M/75M, 60M/60M, 40M/40M, 30M/30M, 25M/25M, 20M/20M, 15M/15M, 10M/10M, 5M/5M, 4M/4M, 3M/3M, 2M/2M, 1M/1M NOTE Device will try to attain the set speed. If line condition degrades (reducing SNR) but the device is able to maintain the link, the DSL SNR/SPEED LED is the indicator to notify user of the reduced SNR.
Moxa Managed DSL Ethernet Extender Featured Functions Ethernet Link-Down Mode If either the CO or CPE Ethernet link is down, the IEX series will disable the corresponding Ethernet connection so that data can no longer be sent but keeps the DSL connection alive. As a result, Ethernet-enabled devices such as the switch or end devices connected to the DSL Ethernet extenders will be notified about the failed connection.
Moxa Managed DSL Ethernet Extender Featured Functions DSL Ethernet Extender Subnet Mask Setting Description Subnet mask for the Identifies the type of network the Moxa DSL Ethernet extender 255.255.255.0 Factory Default Moxa DSL Ethernet is connected to (e.g., 255.255.0.0 for a Class B network, or extender 255.255.255.0 for a Class C network).
Moxa Managed DSL Ethernet Extender Featured Functions Link-Local Address Setting Description None The network portion of the Link-Local address is FE80 and the None Factory Default host portion of the Link-Local address is automatically generated using the modified EUI-64 form of the interface identifier (DSL Ethernet extender’s MAC address) Neighbor Cache Setting Description Factory Default None The information in the neighbor cache that includes the None neighboring node’s IPv6 address, the
Moxa Managed DSL Ethernet Extender Featured Functions Daylight Saving Time The Daylight Saving Time settings are used to automatically set the Moxa DSL Ethernet extender’s time forward according to national standards. Start Date Setting Description Factory Default User-specified date Specifies the date that Daylight Saving Time begins. None Setting Description Factory Default User-specified date Specifies the date that Daylight Saving Time ends.
Moxa Managed DSL Ethernet Extender Featured Functions TFTP Server IP/Name Setting Description Factory Default IP address of TFTP Specifies the IP address or name of the remote TFTP server. None server Must be specified before downloading or uploading files. Configuration Files Path and Name Setting Description Factory Default Max. 40 characters Specifies the path and file name of the Moxa DSL Ethernet None extender’s configuration file on the TFTP server.
Moxa Managed DSL Ethernet Extender NOTE Featured Functions Some operating systems will open the configuration file and log file directly in the web page. In such cases, right click the Export button to save the file. Upgrade Firmware To import a new firmware file into the Moxa DSL Ethernet extender, click Browse to select the firmware file that is saved on your computer. The upgrade procedure will proceed automatically after clicking Import.
Moxa Managed DSL Ethernet Extender Featured Functions Configuring SNMP The Moxa DSL Ethernet extender supports SNMP V1, V2c, and V3. SNMP V1 and SNMP V2c use a community string match for authentication, which means that SNMP servers access all objects with read-only or read/write permissions using the community strings public and private by default. SNMP V3 requires that you select an authentication level of MD5 or SHA, and is the most secure protocol.
Moxa Managed DSL Ethernet Extender Featured Functions SNMP Read/Write Settings SNMP Versions Setting Description Factory Default V1, V2c, V3, or Specifies the SNMP protocol version used to manage the DSL V1, V2c V1, V2c, or V3 only Ethernet extender. V1, V2c Read Community Setting Description Factory Default Max. 30 characters Specifies the community string to authenticate the SNMP agent Public for read-only access.
Moxa Managed DSL Ethernet Extender Featured Functions Trap Settings SNMP traps allow an SNMP agent to notify the NMS of a significant event. The DSL Ethernet extender supports two SNMP modes, Trap mode and Inform mode. SNMP Trap Mode—Trap In Trap mode, the SNMP agent sends a SNMPv1 trap PDU to the NMS. No acknowledgment is sent back from the NMS so the agent has no way of knowing if the trap reached the NMS. SNMP Trap Mode—Inform SNMPv2 provides an inform mechanism.
Moxa Managed DSL Ethernet Extender Featured Functions Using Auto Warning Since industrial Ethernet devices are often located at the endpoints of a system, these devices will not always know what is happening elsewhere on the network. This means that an industrial DSL Ethernet extender that connects to these devices must provide system maintainers with real-time alarm messages.
Moxa Managed DSL Ethernet Extender Featured Functions Configuring Email Settings Mail Server IP/Name Setting Description Factory Default IP address The IP Address of your email server. None Setting Description Factory Default SMTP port Display the SMTP port number 25 Setting Description Factory Default Max. 45 of charters Your email account.
Moxa Managed DSL Ethernet Extender NOTE Featured Functions Auto warning e-mail messages will be sent through an authentication protected SMTP server that supports the CRAM-MD5, LOGIN, and PAIN methods of SASL (Simple Authentication and Security Layer) authentication mechanism. We strongly recommend not entering your Account Name and Account Password if auto warning e-mail messages can be delivered without using an authentication mechanism.
Moxa Managed DSL Ethernet Extender Featured Functions LLDP Function Overview LLDP is an OSI Layer 2 protocol defined by IEEE 802.11AB. LLDP standardizes the self-identification advertisement method, and allows each networking device, such as a Moxa managed DSL Ethernet extender, to periodically send its system and configuration information to its neighbors.
Moxa Managed DSL Ethernet Extender Featured Functions Using Monitor You can monitor statistics in real time from the Moxa DSL Ethernet extender’s web console and serial console. Monitor by DSL Ethernet extender Access the Monitor by selecting System from the left selection bar. Monitor by System allows the user to view a graph that shows the combined data transmission activity of all of the Moxa DSL Ethernet extender’s 18 ports.
Moxa Managed DSL Ethernet Extender Featured Functions IEX-402-VDSL2 Series Using the MAC Address Table This section explains the information provided by the Moxa DSL Ethernet extender’s MAC address table. The MAC Address table can be configured to display the following Moxa DSL Ethernet extender MAC address groups, which are selected from the drop-down list: ALL Select this item to show all of the Moxa DSL Ethernet extender’s MAC addresses.
4 4.
Moxa Managed DSL Ethernet Extender Quick Diagnosis and Easy Management On-site Troubleshooting The LED indicators of IEX series provides complete system and link status for quick on-site troubleshooting. When the system boots up, the connected pairs will start the CO/CPE detection before negotiating the connection speed over the DSL link. The CO/CPE LEDs will alternate colors (between green and amber) until both devices have finalized the setting.
Moxa Managed DSL Ethernet Extender Quick Diagnosis and Easy Management Remote Management The virtual panel in the web-based browser and SNMP protocols allows the IEX series to be remotely managed at a glance and allows the devices to be managed by Moxa’s MXview network management software for total network manageability. NOTE Please download the IEX MXview plug-in for MXview 2.2 or older versions.
Moxa Managed DSL Ethernet Extender Quick Diagnosis and Easy Management Performance The IEX series is the ideal solution to extend point-to-point Ethernet connections over 2-wire copper cables. Many factors will affect the DSL performance, including connection distance, environmental noises, and cable quality. The tables below show performance results when tested under noise-free conditions with a line simulator. IEX-402-SHDSL Series Distance Data Rate (kbps) meter feet Annex B & PE.
A A. MIB Groups The Moxa DSL Ethernet extender comes with built-in SNMP (Simple Network Management Protocol) agent software that supports cold/warm start trap, line up/down trap, and RFC 1213 MIB-II. The standard MIB groups that the Moxa DSL Ethernet extender supports are as follows MIB II.1—System Group sysORTable MIB II.2—Interfaces Group ifTable MIB II.4 – IP Group ipAddrTable ipNetToMediaTable IpGroup IpBasicStatsGroup IpStatsGroup MIB II.
Moxa Managed DSL Ethernet Extender • Link Up • Link Down • Authentication Failure MIB Groups Private Traps • Configuration Changed • Power On • Power Off A-2