Instructions for M80 GameSpy Digital Camera THANK YOU for your purchase of the M80 GameSpy Digital Camera. Please read this booklet before using the unit. If you should have any questions about this product or any other Moultrie product, please contact us using the information on the back of this booklet. Please register your camera at www.moultriefeeders.com to activate your warranty.
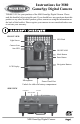
ON / OFF / AIM SWITCH Used for turning On, turning Off, or Aiming the camera. When in AIM position the red LED light on the front of the camera will illuminate. To help find the center field of view for the camera, stand out in front of the camera and move left or right as you observe the AIM LED - as you walk away from direct center the LED light will be less bright. As you walk towards center the LED will appear brighter. MODE BUTTON The Mode Button selects Camera Setup or Main Screen.
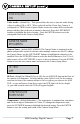
Slide the UNLOCK switch on the bottom of Camera and use the knob to pull the slide-out Battery Tray. Install four(4) or eight(8) AA size alkaline or lithium batteries with polarities as indicated in the Battery Tray. Re-install the Battery Tray. Thread the provided Mounting Strap through the Eyelets on the back of the camera and secure to a tree or pole approximately 36" from the ground as shown. Turn Camera on by sliding ON/OFF/AIM switch to the ON position.
CAPTURE MODES The GameSpy offers four capture modes as described below. The default capture mode is Trail Cam. TRAIL CAM MODE Still photos are taken when an animal is detected. The number of photos taken when an animal is detected is configurable in Settings. Photos are stored in the in the DCIM/100_MDGC folder on the SD card. PLOT CAM MODE The camera takes photos at a specified interval during the day and combines them together to create a Plot Video (*.
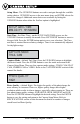
Setup Menu - The UP/DOWN buttons are used to navigate through the available setting choices. UP/DOWN moves to the next menu item, and ENTER selects the item to be changed. Additional menu choices are available by hitting the UP/DOWN button when either the first/last option is highlighted. SETUP DATE/TIME MM.DD/YY HH:MMAM Date/Time - Set Date /Time - on the SETUP DATE/TIME screen, use the UP/DOWN buttons to modify the month. Press LEFT/RIGHT buttons to move to the next field.
PHOTO DELAY 1 MIN Photo Delay - (default 1 minute) -The photo delay determines the number of minutes between pictures when an animal is detected and remains in range. To change the delay time, press the UP/DOWN buttons to highlight the desired setting. Press the ENTER button to save the setting and return to the Camera Setup Menu. Additional menu choices are available by hitting the UP/DOWN button when the first/last option is highlighted.
VIDEO AUDIO ON Video Audio - (default On) - This option allows the user to turn the audio during video recording ON or OFF. When selected and the Game Spy Camera is configured for VIDEO in the Capture Mode screen; the camera will record audio along with the video each time an animal is detected. Press the LEFT/RIGHT buttons to highlight the desired setting. Press the ENTER button to save the setting and return to the Camera Setup Menu.
INFO STRIP ON Info Strip - (default On) -When the Info Strip is turned ON, the information strip, as described in the Advanced Setup section of this manual, is imprinted on the photos. The Barometer, Temperature, Moon phase, Date, Time, Camera Name, & Moultrie logo are imprinted on the bottom of each picture. When the Info Strip is turned OFF, the photo contains no information strip. To change the Info Strip setting, press the LEFT/RIGHT buttons to highlight the desired setting.
BATTERY LIFE 67 DAYS Battery Life- This feature provides an estimated battery life of the camera. The battery life is expressed as “### Days”. Pressing the MODE button will return to the Camera Setup menu. NOTE: The number of days shown is based on using 8 AA alkaline batteries with 5 day and 5 night photos per day. Actual battery life will vary depending on type of battery, weather conditions and camera usage. It is recommended to use lithium batteries for best performance.
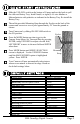
VI ADVANCED INFORMATION VIEWING PICTURES ON COMPUTER VIA USB 1. Plug provided USB cable into the USB port on your Windows 7/Vista/XP computer. 2. Plug other end of USB cable into the camera's USB port. 3. To access JPG pictures and AVI movie files, navigate to "My Computer" and double click the "Moultrie CAM" drive. Picture files will be stored In the DCIM/100_MDGC directory; video files are located in the DCIM directory. 4.
VI ADVANCED INFORMATION (cont.) INFORMATION ON PICTURE The info strip below will appear at the bottom of the photo/video: 75oF Temp.
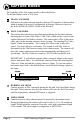
Photo Quality LOW MEDIUM HIGH ENHANCED Video Quality HIGH LOW Approximate photos stored 1GB SD card LOW MEDIUM HIGH ENHANCED Approximate video time stored 1GB SD card HIGH LOW Optional SD Memory Card Optical Field of View Batteries Approximate Detection Range Page 12 M80 GameSpy Digital Camera 1480 X 832 (1.3MP) 1848 x 1040 (3.2 MP) 2616 x 1472 (4.0 MP) 3248 x 1824 (6.
A PLOTSTALKER SOFTWARE INTRO INTRODUCTION In time-lapse photography a series of still photos are taken at regular time intervals. The PlotStalker Software allows you to load the time lapse file that was captured from your Moultrie Game Camera and scroll backward and forward through your photos, single step, search for activity in a designated area, and save the files. SYSTEM REQUIREMENTS Computer: Intel® Pentium® 4 or AMD Athlon® 64 processor or above; 1GB > RAM minimum; 100 MB hard disk space minimum.
B PLOTSTALKER ACTIVITY SEARCH ACTIVITY SEARCH The Search Feature will scan through your photos and automatically look for changes in regions that you identify in Setup. In search mode, the PlotStalker software scans through the .mlt photo file, stops on a photo when changes are found in your identified region, and then highlights the changes in blue. You can click anywhere in the video viewing area to remove the blue highlights.
C PLOTSTALKER SAVE FILE SAVING FILES OVERVIEW Use the Save File features of the PlotStalker software to create a single photo, reduce the overall size of the .mlt file, exclude unwanted photos in the front, or create a video that can be viewed using a standard media player. EXPORTING AN IMAGE/PHOTO 1 2 3 4 5 On the main screen, choose a starting image/ photo (frame) by using the scroll bar on the bottom of the display or the frame-by-frame search feature.
12222010R1/ MFH-DGS-M80