
Operation Manual

9
Before using the appliance for the first
time, clean all of the accessories in soapy
water. Rinse and dry them carefully.
Plug your appliance in. The motor unit
(A1) is turned on by pressing the Turbo
button (A2) or the speed button (1) and
selecting a speed from 1 to 16 to on the
switch (A4) and pressing the button (A3).
In some cases (if too much mixture
has been put into the bowl or
appliance has been used for too long),
the power supply to the appliance may
be switched off and it will stop
working. If this happens you should
leave the appliance to cool down for
30 minutes before using it again.
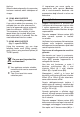
1. Blender shaft (fig. 3):
Fit the blender shaft (B1) to the motor unit
(A1) until it clicks.
The container that you are using must
be filled no more than two thirds full to
avoid overflowing. The mixture must at
least cover the bottom of the blender to
ensure that the blending is efficient.
Remove the cooking container off the
heat to blend hot mixtures. Do not
hesitate to move the blender shaft around
the container to optimise the blending
process.
For stringy foods (leeks, celery, etc.),
clean the shaft regularly as you use it,
following the safety instructions for
dismantling and cleaning.
For fruit mixtures, cut the fruit and remove
any stones or hard pips before you start.
Do not use the blender shaft with hard
foods such as coffee beans, ice cubes,
sugar, cereals, chocolate.
Press the ejecti button (A5) to remove the
blender shaft (B1) when you have
finished using it.
Using for the first time
Instructions for use
2. Whisk (H)
(fig. 4 - according to model)
If you wish to obtain this accessory, it is available
f
rom our after sales service (see list of approved
centres enclosed) under the references:
MS0695561 & MS5937064.
Attache the whisk (C2) into the whisk
holder (C1) then fit this assembly on to
the motor unit (A1).
Using the whisk (C2), you can make
lightweight preparations (mayonnaise,
pancake mixture, whip egg whites, whip
cream, etc.)
Press the eject button (A5) to remove the
accessories when you have finished
using them.
3. Emulsifying disk
(fig. 4
-
according to model)
If you wish to obtain this accessory, it is available
from our after sales service (see list of approved
centres enclosed) under the reference:
MS0695636.
Place the blade holder (E8) in the centre
of the bowl (E) on the axis. Place the
emulsifying disk (E10) on the blade
holder (E8).Place the reducer (E6) on the
lid (E3) in its housing.
Using the emulsifying disk (E10), you can
make light mixtures (mayonnaise,
pancake batter, whisked egg whites,
whipped cream, etc.)
4. Mini chopper 150 ml
(fig. 5
-
according to model)
If you wish to obtain this accessory, it is available
from our after sales service (see list of approved
centres enclosed) under the reference:
MS5981760.
Carefully place the blade (I2) into the
bowl (I) along the central axis, holding it
by the plastic part as you do so.
Place the food in the bowl. Do not fill the
bowl (I) higher than the maximum
limit.
Place the cover lid (I3) in the bowl and
then place the lid (I4) on top, ensuring
that the drive mechanism is properly
positioned on the blade. Put the motor