
Specifications

LAN/Subnet Configuration 3-13
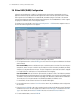
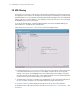
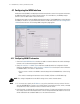
To configure the bridge:
1. Set the Priority for the bridge. Set the Priority as low as possible to force other devices within the mesh
network to defer to this bridge as the root. A root bridge defines the mesh configuration. Motorola
recommends assigning a Base Bridge AP with the lowest bridge priority so it becomes the root in the STP.
If a root already exists, set the Bridge Priorities of new APs accordingly so that the root of the STP does
not get altered. Each access point starts with a default bridge priority of 32768.
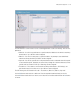
2. Set the Maximum Message age timer is used with the Message Age timer. The Message Age timer
is used to measure the age of the received protocol information recorded for a port, and to ensure the
information is discarded when it exceeds the value set for the Maximum Message age timer.
3. Set the Hello Timer. The Hello Time is the time between each bridge protocol data unit sent. This time
is equal to 2 seconds by default, but you can tune the time to be between 1 and 10 seconds. If you drop
the hello time from 2 seconds to 1 second, you double the number of bridge protocol data units sent or
received by each bridge. The 802.1d specification recommends the Hello Time be set to a value less
than half of the Max Message age value.
4. Set the Forward Delay. It is the time spent in the listening and learning state. This time is equal to 15
seconds by default, but you can tune the time to be between 4 and 30 seconds. The 802.1d specification
recommends the Forward Delay be set to a value greater than half the Max Message age timeout
value.
5. The Forwarding Table Ageout value defines the length of time an entry will remain in the a bridge's
forwarding table before being deleted due to lack of activity. If the entry replenishments a destination
generating continuous traffic, this timeout value will never be invoked. However, if the destination
becomes idle, the timeout value represents the length of time that must be exceeded before an entry is
deleted from the forwarding table.
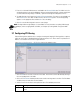
6. To enable wireless trunking, check the Enable Wireless Trunking check box. Also provide the IDs of
the VLAN which allow tunneling.