
Specifications


3-10 WS2000 Wireless Switch System Reference Guide
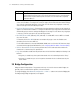
3.4 Advanced Subnet Access Settings
There can be situations in which the standard subnet access setting process is not specific enough for the
needs of an organization. Instead, access or firewall rules need to be defined based upon destination and
source IP addresses, transport types, and ports. The Advanced Subnet Access screen allows the
administrator to create more complicated inbound and outbound policies.
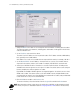
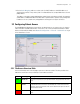
Select Network Configuration --> Firewall --> Advanced Subnet Access from the left menu. The
screen consists of two areas. The Settings area enables or disables the data found on this screen. The
Firewall Rules area displays the currently defined and active firewall rules. This area will display either the
inbound or outbound rules. The rules are applied in the order that they are listed. The rules at the top of the
list take precedence over the rules lower in the list.
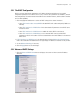
1. To enable the advanced access settings, check the Override Subnet Access and NAT settings box.
The rest of the screen will become active. When this box is not checked, the settings in both the Subnet
Access screen (under Firewall) and the NAT screen (under WAN) are disabled; the switch will use the
settings found on this screen instead.
2. If you want the application to translate the subnet access settings into Firewall Rules (displayed in the
lower area), click the Import rules from Subnet Access button. This button removes the need for the
administrator to reenter the information defined on the Subnet Access screen.
Next, add, delete, or modify rules in the Firewall Rules list, as required.
3. Select Inbound or Outbound from the pull-down menu at the top of the Firewall Rules area, to display
either the inbound (data entering the LAN) or outbound (data exiting the LAN) rules.
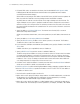
4. To modify a rule, select the rule from the Firewall Rules list, then edit the fields by clicking in the field
to modify. Often a dialog box will appear to facilitate the entry of the field data.
5. To add a rule, click the Add button and then add data to the six rule fields. Note that not all fields are
required.
6. To delete a rule, select a rule from the list and click the Del button.