
Specifications


3-4 WS2000 Wireless Switch System Reference Guide
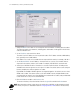
1. Change the Name of the subnet to use a descriptive name that indicates something about the subnet.
The name can contain seven characters, including spaces and numbers. It will appear in the left menu
under the LAN menu item.
2. Set an IP address to be used for the subnet.
The switch uses the IP address to refer to a particular subnet. This IP address could be a WAN address;
but is generally a non-routable address.
An IP address uses a series of four numbers that are expressed in dot notation, for example, 194.182.1.1.
3. Set the Network Mask for the IP address. A network mask uses a series of four numbers that are
expressed in dot notation, similar to an IP number. For example, 255.255.255.0 is a network mask.
4. Select a port or WLAN from the list of Interfaces to associate it with the subnet. Six LAN ports are
available on the switch. Assign from one to six ports to a subnet. Two subnets cannot use the same port.
However, multiple ports can be assigned to one subnet.
Eight WLANs are available. WLAN assignments are logical designations. Associate from zero to three
WLANs with a subnet. Two subnets cannot use the same WLAN. However, multiple WLANs can be
associated with one subnet. If two or three WLANs are associated with one subnet, each port dedicated
to that subnet can use any of the associated WLANs.
5. Click the Add button to add it to the Interfaces list.
To remove an interface, select that interface from the Assigned list and click the Delete button.
NOTE: Note that wireless devices cannot access the switch unless a WLAN is configured and associated
with a subnet. (This process is described in detail in Configuring Wireless LANs section of this document.)