
Specifications


WS2000 Use Cases 12-45
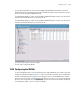
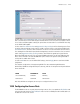
For the engineering WLAN, Leo selects the AP with MAC of 00:A0:F8:BB:FC:94 and makes sure that all
WLAN check boxes are not checked. He then selects the WLAN1 check box for this AP. He performs the same
actions for the AP with MAC of 00:A0:F8:BB:FC:95.
For the Marketing WLAN, Leo selects the AP with MAC of 00:A0:F8:BB:FC:96. He makes sure that only the
check box under the WLAN2 column is selected for this AP.
For the Marketing WLAN, Leo selects the AP with MAC of 00:A0:F8:BB:FC:97. He makes sure that only the
check box under the WLAN3 column is selected for this AP.
Leo clicks the Apply button to save his changes.
The next step is configure the WLANs.
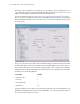
12.24 Configuring the WLANs
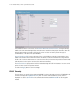
Leo has specified which Access Ports go with which wireless LANs (WLANs). Now, he needs to name and
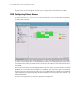
configure each WLAN. He expands the Wireless node in the left menu, and selects the first WLAN listed.
Leo gives the WLAN the name EngWLAN so that subsequent screens in the WS2000 interface will be a
little easier to read. The ESSID is the identification string that his users will see, so he uses a name that will
be easy for them to recognize, the string Engineering. The interface shows that this WLAN is already part
of the Engineering subnet, so there is no reason to change it.