
Specifications


Using DDNS 9-3
2. Enter a range of IPs in the Address Assignment Range fields.
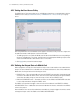
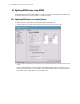
3. Click the Advanced DHCP Server button to open the Advanced DHCP window.
4. In the Advanced DHCP Server window check the box next to Enable Dynamic DNS.
5. Select either Single User Class Option or Multiple User Class Option depending on the settings of
your DHCP clients.
Any DHCP client can send the User Class Id either in the Single or Multiple user class ID format. The
Single or Multiple User class option is provided to enable the switch to interpret the correct format in
which the user class ID is sent by the client. The switch then retrieves the correct value of the user class
ID sent by the DHCP client based on the selected format. This same user class ID format is used for the
DDNS messages.
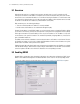
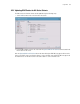
6. Enter IP Addresses in Primary DNS Server, Secondary DNS Server and Default Gateway and click
the Ok button to return the Subnet configuration screen.
7. Click the Apply button on the Subnet configuration screen to save the changes and activate DDNS for
that subnet.