
Specifications


Getting Started 2-5
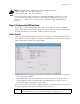
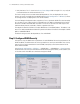
NOTE: The WS2000 switch is shipped with an open default SNMP configuration:
Community: public, OID: 1.3.6.1, Access: Read-only
Community: private, OID: 1.3.6.1, Access: Read-write
If your switch has these settings, it is important to change them immediately; otherwise, users on the
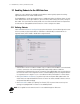
same network will have read-write access to the switch through the SNMP interface. Select System
Configuration --> SNMP Access from the left menu to examine the settings and change them, if
necessary.
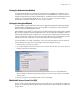
Step 4: Configure the LAN Interface
The first step of network configuration process is to figure out the topology of the LAN. The WS2000
Wireless Switch allows the administrator to enable and configure six different subnets. The administrator
can assign an IP address, port associations, and DHCP settings for each subnet.
Enable Subnet1
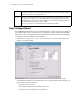
Select LAN under the Network Configuration group from the left menu. Use the LAN configuration screen to
view a summary of physical-port addresses and wireless LANs (WLANs) associated with the six supported
subnets, and to enable or disable each configured subnet.
1. In the LAN screen, the administrator can enable up to six subnets. Make sure that the check box to the
left of Subnet1 line is enabled.
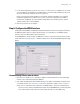
Each enabled subnet shows up in the directory tree in the left column of the configuration screens.
Consider disabling a previously configured subnet if its assigned ports are no longer in use, or to
consolidate the LAN’s communications on fewer subnets.
The rest of the information on this screen is summary information; it is collected from other screens (such as
the subnet configuration screens) where the administrator can set the data.
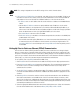
Network Network (subnet) name is a descriptive string that should describe the subnet’s function. The WS2000
Network Management System uses subnet names throughout the configurations screens.