
Specifications


7-50 WS2000 Wireless Switch System Reference Guide
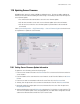
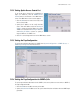
7.11.1.2 Setting Up SNMP v3 Community Definitions
Setting up the v3 user definition is very similar to the v1/v2c community definitions. The difference is the
addition of a user security level and a user password.
1. To create a new SNMP v3 user definition, click the Add button in the SNMP v3 User Definitions area.
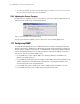
2. Specify a user name in the Username field.
3. Select a security level from the Security pull-down menu. Select from the following choices:
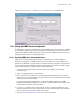
4. Click in the OID cell of the table. Either use the OID (Object Identifier) pull-down menu to select the
default OID or type in an OID number into the field. (The format is in a numerical dot notation, and valid
numbers can be found within the MIB.)
If is selected, the community will have access to all the OIDs (SNMP parameters) in the SNMP
Management Information Base (MIB) file. If a custom OID is entered, the administrator can allow access
to specific OIDs in the MIB to certain communities.
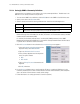
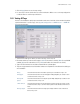
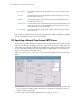
5. Click the Password button in the cell and the Password Settings screen appears.
6. Use the Access pull-down menu to specify read-only (R) access or read/write (RW) access for the
community. Read-only access allows a remote device to retrieve switch information, while read/write
access also allows a remote device to modify switch settings.
7. Follow the directions for setting up the Access Control List (below).
noAuth (no authorization) Allows the user to access SNMP without authorization or encryption
AuthNoPriv (authorization without privacy) Requires the user to login, however no encryption is used
AuthPriv (authorization with privacy) Requires the user to login and encryption is used
1.Select an Authentication Algorithm from the
drop-down menu, either MD5 or SHA1.
2.Type in an Authentication Password.
3.Select a Privacy Algorithm from the drop-down
menu. The options include:
• DES
• AES 128-bit
4.Type in a Privacy Password that matches the
algorithm.
5.Click Ok, when done.