
Specifications


2-2 WS2000 Wireless Switch System Reference Guide
2.1 Getting Started with the WS2000 Wireless Switch
This section provides just enough instruction to set up the WS2000 Wireless Switch, connect an Access Port,
and test communications with a single mobile unit (MU) and the wide area network (WAN). The configuration
suggestions made here are just the minimum needed to test the hardware. Once finished with this section,
additional configuration settings are required. This section covers the following topics:
Step 1: Install the Switch
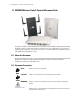
To install the WS2000 Wireless Switch hardware, follow the directions in the WS2000 Wireless Switch
Quick Installation Guide found in the box with the switch and on the CD-ROM that is distributed with the
switch. These instructions describe how to:
• Select a site (desk, wall, or rack) for the switch
• Install the switch using the appropriate accessories for the selected location
• Connect devices to WAN and LAN ports (using standard CAT-5 cables)
• Interpret the port LEDs on the front of the switch
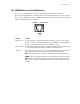
After the switch is mounted and powered up, connect the following items to the switch:
1. Connect the WAN to the switch (using the WAN port) with a CAT-5 Ethernet cable. The LEDs for that port
should start to flash.
2. Connect an Access Port to the switch using a CAT-5 Ethernet cable using one of the six LAN ports. If the
Access Port requires PPPoE, connect the Access Port in ports 1, 2, 3, or 4. Ports 5 and 6 do not provide
power.
3. Have a mobile “wireless” device available to test communication with the Access Port.
NOTE: Access Ports must be connected to the LAN ports of the wireless switch to enable configuration of
the Access Port related settings.
Step 2: Set Up Administrative Communication to the Switch
Before the configuration process can begin, establish a link with the wireless switch.
1. Connect a “wired” computer to the switch (in any one of the available LAN ports) using a standard
CAT-5 cable.
2. Set up the computer for TCP/IP DHCP network addressing and make sure that the DNS settings are not
hard coded.
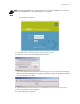
3. Start up Internet Explorer (with Sun Micro systems’ Java Runtime Environment (JRE) 1.4 or higher
installed) and type the following IP address in the address field: 192.168.0.1
• Step 1: Install the switch and connect it to the
WAN, a stand alone computer, and an Access
Port
• Step 2: Set up administrative communication
to the switch
• Step 3: Set the basic switch settings
• Step 4: Configure the LAN interface
• Step 5: Configure Subnet1
• Step 6: Configure the WAN Interface
• Step 7: Enable Wireless LANs (WLANs)
• Step 8: Configure WLAN Security
• Step 9: Test Connectivity