
Specifications

6-12 WS2000 Wireless Switch System Reference Guide
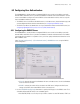
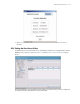
2. Enter the required password in the Password text box. You can also generate a random password. To
generate a random password, click the Password Generate button. A 10 character long password is
generated.
3. Select the User Group the new user will belong to. Click on User Group to display a list of guest user
groups. Select the appropriate guest user group.
4. Two options are available to set the life of the new guest user. You can choose to enter the expiry date
and time or select a preset duration after which the user login expires.
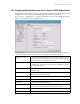
To set a preset time for login expiry, select Preset Values option. A list with a range of preset values is
enabled. Select the appropriate value from the list.
To set a particular date and time when the login expires, select Date option. The Expiry Date and Expiry
Time text box are enabled. Enter the date on which the login expires in the format dd:mm:yyyy in the
Expiry Date box. Similarly, enter the time on which the login expires in the format hh:mm in the Expiry
Time box.
5. Click Apply to create the new user. Or, click Undo Changes to revert back the changes made to this
screen.
To create multiple users, repeat the above steps and click Apply to create each user.
NOTE: RADIUS guest user accounts are removed from the database 24 hours after the user account’s
validity period expires.
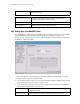
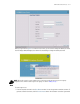
6.2.5.1 Printing Guest User Account Information
To provide each guest user details about their user account, use the print feature. This feature is provided
To print a guest account’s details:
1. Click Print. The PRINT dialog appears.
2. From the Select the User to print drop down list, select the user to print information for. The user
information is displayed in the PRINT dialog.