
Specifications

6-10 WS2000 Wireless Switch System Reference Guide
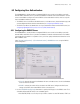
2. To set a group as a group of Guest users, click the check box in the Guest column, next to the Groups field.
3. To enable a group access to a particular VLAN, enter the ID in the VLAN ID field for the group.
4. To restrict access to set times, enter the appropriate time values in “hhmm” (24 hours) format. Enter the
access start time and end time in the Start Time and End Time fields respectively.
5. To restrict access to set days in a week, select the appropriate week days from a dialog box that appears
when the Day Access field is clicked.
6. Click Apply to save the changes.
6.2.4.2 Deleting Groups
To remove a group, select that group from the table and click the Del (Delete) key. A warning message will
appear when you apply the change if there are users still assigned to the group. You can then remove the
group from each user or add the group back to the group list.
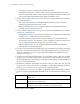
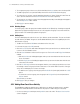
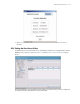
6.2.4.3 Adding Users
The Users table displays the entire list of users. Up to 100 users can be entered here. The users are listed in
the order that they are added. Though users can be added and deleted, there is no capability at present to
edit the name of a group.
1. To add a new user, click the Add button at the bottom of the Users area.
2. In the new line, type a User ID (username).
3. Click the Password cell. A small window will appear. Enter a password for the user and then click OK
to return to the User Database screen.
4. Click the Guest check box to make a User ID as a guest user. The Start Date and Expiry Date fields are
enabled.
a. Click the Start Date cell. A dialog box appears where you can enter the date from when the user can
access the network.
b. Click the Expiry Date cell. A dialog box appears where you can enter the date after which the user
cannot access the network.
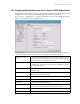
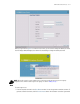
5. Click the List of Groups cell. A new screen appears that lets you associate groups with the user. A user
must belong to at least one group for them to have access to the switch. When a User ID is of the type
Guest, this list will display a list of Guest User Groups.
• To add the user to a group, select the group in the Available list (on the right) and click the <-Add
button.
• To remove the user from a group, select the group in the Assigned list (on the left) and click the
Delete-> button.
Click OK when you are done.
6. Click Apply to save your changes.
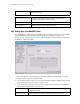
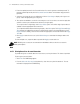
6.2.5 Adding New Guest Users Quickly
The WS2000 also enables the administrators to add a guest user quickly. A separate screen is provided
outside of the normal administrative environment for this purpose. To add a new guest user quickly:
1. Use the user name guest and the password symbol to access the switch. The Guest User Creation
screen is displayed.