
Specifications

84
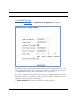
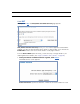
Check the Enabled checkbox
and click the
Submit button.
The screen expands to
allow you to enter subnet
information.
If DHCP Server (see
below) is not enabled, the
DHCP Start Address and
DHCP End Address fields
do not appear.
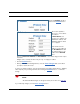
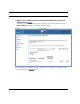
Enter the Router’s IP
address on the subnet in
the IP Address field and
the subnet mask for the
subnet in the Netmask
field.
Enter the DHCP Start Address and End Address of the subnet range in their respec-
tive fields.
Ranges cannot overlap and there may be only one range per subnet.
• Click the Submit button.
• When you are finished adding subnets, click the Save Changes button, and when
prompted, restart the Router.
To delete a configured subnet, set both the IP address and subnet mask values to 0.0.0.0,
either explicitly or by clearing each field and clicking the Submit button to commit the
change.
☛ NOTE:
All additional DHCP ranges use the global lease period value. See page 82.
If you make any changes, click the Sa
ve Changes button.