
User Guide


Table Of Contents
- CONTENTS
- Safety
- Introduction
- Radio Overview
- Getting Started
- Battery Information
- Accessory Information
- Turning your Radio On or Off
- Adjusting the Volume
- Selecting a Trunked Zone and Talkgroup
- Sending a Trunked Call
- Selecting a Conventional Zone and Channel
- Sending a Conventional Call
- Receiving a Trunked or Conventional Call
- Repeater or Talkaround J Mode
- Call Light
- (Trunked Operation Only)
- Home Channel Revert
- PassPort Trunking
- PassPort Signaling
- Radio Calls
- Scan
- Talkback
- PassPort Primary Auto Group Scan
- (PassPort Trunked Operation Only)
- PassPort Group Scan G
- (PassPort Trunked Operation Only)
- Auto Group Scan G
- (LTR Trunked Operation Only)
- All Group Scan G
- (LTR Trunked Operation Only)
- System Scan G
- (LTR Trunked and conventional Operation Only)
- Deleting a Nuisance Channel or Talkgroup
- Editing a Scan List
- View a Scan List
- Adding or Deleting Talkgroups or Channels in a Scan List
- Prioritizing a Talkgroup or Channel in a Scan List
- Phone
- Voice Storage
- Audio/Tone Settings
- Utilities
- Warranty
- Accessories
- 88C42-E_french.pdf
- Table des Matiéres
- Sécurité
- Introduction
- Aperçu de la radio
- Mise en route
- Informations sur la pile
- Informations sur les accessoires
- Activation ou désactivation de votre radio
- Réglage du volume
- Sélection d'une zone ou d'un groupe de conversation partagé
- Envoi d’un appel partagé
- Sélection d'une zone ou d'un canal conventionnel
- Envoi d’un appel conventionnel
- Réception d’un appel partagé ou d'un appel conventionnel
- Mode Relais ou Intercommunication J
- Voyant d’appel
- (Opération partagée seulement)
- Retour au canal d'origine
- Signalement PassPort
- Commutation PassPort
- Appels radio
- Appel sélectif
- Réception d’un Appel sélectif F
- Envoi d’un message Avis d’appel
- Réception d’un Avis d’appelF
- Verific. Radio
- Envoi d’un Message d’état
- Envoi d’un message
- Réception d’un message
- Envoi d'un signal d'urgence E
- (Modes conventionnel et LTR uniquement)
- Modification d’un répertoire de radios K
- Identification des noms et des tonalités d’appel
- Balayage
- Réponse
- Balayage automatique des groupes principaux PassPort
- (Opération partagée PassPort seulement)
- Balayage de groupes PassPort G
- (Opération partagée PassPort seulement)
- Balayage automatique de groupes G
- (Opérations partagées LTR seulement)
- Balayage automatique de tous les groupes G
- (Opérations partagées LTR seulement)
- Balayage du système G
- (opération partagée LTR et conventionnelle seulement)
- Suppression d’un canal ou d’un groupe de conversation importun
- Modification d’une liste de balayage
- Afficher une liste de balayage
- Ajout ou suppression de groupes de conversation ou de canaux dans une liste de balayage
- Classer par ordre de priorité un groupe ou un canal dans une liste de balayage
- Téléphone
- Messagerie vocale
- Paramètres audio/ tonalité
- Fonctions auxiliaires
- Garantie
- Accessoires
28
English
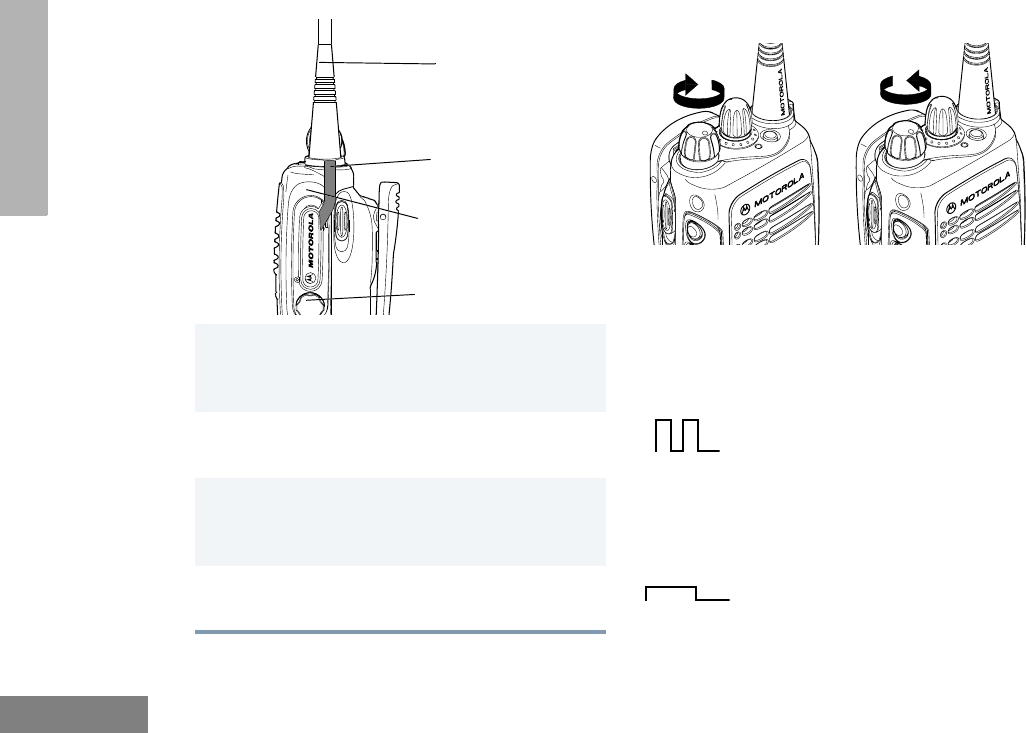
GETTING STARTED
Attaching the Side Connector Cover
TURNING YOUR RADIO ON OR OFF
1 Place the loop (attached to the side connector
cover) over the antenna; then slide it
downward until it touches the top of the radio.
2 Insert the tab on the top of the cover into the
slot above the connector.
3 Position the cover over the connector and
align the thumbscrew with the threaded hole
in the radio.
4 Tighten the thumbscrew to hold the cover in
place. Do not overtighten the thumbscrew.
Thumbscrew
Slot
Loop
Antenna
Turn the On/Off/
Volume knob clockwise.
If power-up is
successful, you hear a
Self-Test Pass Tone
and see the LED
momentarily turn green.
If your radio fails to
power up, you hear a
Self-Test Fail
Tone
.
Turn the On/Off/
Volume knob
counterclockwise
until you hear a click.
ON OFF