
User`s guide


4-14 CB3000 Client Bridge User’s Guide
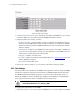
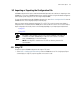
Figure 4.10 DHCP Server Settings
2. Select the Enable DHCP Server support radio button. This enables the CB3000 to act as a host server
to allocate IP addresses to those devices joining the CB3000 initiated Ad-hoc network.
3. Configure the DHCP server settings, as follows:
• IP Range for DHCP – This range provides a means of controlling a low and high value for the IP
addresses on the CB3000 network. Define the range of IP addresses you would like the CB3000 to
provide to DHCP clients joining the CB3000-initiated Ad-hoc network. The valid range of numbers is
between 1 and 254.
• Subnet Mask – IP address for the CB3000 DHCP server connection. This number is available from
the ISP for a DSL or cable-modem connection, or from an administrator if the CB3000 connects to a
larger network. A typical subnet mask is 255.255.255.0.
• Gateway – IP address of the DHCP server.
• First DNS – A DNS server translates human readable addresses (i.e, www.motorola.com
) into an IP
address readable by a computer.
• Second DNS – Backup DNS server.
4. Click Apply to save the settings, or Cancel to exit the screen without saving your changes.
4.2.5 Time Settings
Time synchronization is recommended for the CB3000’s network operations. Therefore, setting the CB3000’s
internal time is required for network clock synchronization in a CB3000’s managed network environment.
The CB3000 (an NTP client) periodically synchronizes its time with a master clock (an NTP server). For
example, the CB3000 sets its clock to 07:04:59 upon reading a time of 07:04:59 from its designated NTP
server. Support for both of these options is available in the Time Settings screen.
To configure clock synchronization on the CB3000:
1. Select Management > Time Settings from the CB3000 menu tree. The Time Settings screen displays.
WARNING! The time setting will be lost on a reboot, and it will
start with the default time, i.e., January 1, 2000.