
User`s guide


4-12 CB3000 Client Bridge User’s Guide
4.2.2.3 SNMP Destination
Traps generated by the CB3000 can be sent to one or more destinations. To configure a SNMP trap
destination for receiving SNMP traps generated by the CB3000:
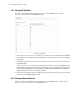
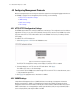
1. Select Management > SNMP > SNMP Trap Destinations from the CB3000 menu tree. The SNMP
Trap Destinations screen displays.
Figure 4.8 SNMP Trap Destinations
2. Configure the remainder of the fields.
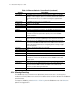
• Destination IP – Specify a destination IP address for receiving the traps sent by the CB3000 SNMP
agent.
• Port – Specify a destination User Datagram Protocol (UDP) port for receiving traps.
• Community – Enter a community name specific to the SNMP-capable client that receives the traps.
• SNMP Version – Use the SNMP Version drop-down menu to specify v1 or v2. Some SNMP clients
support only SNMP v1 traps, while others support SNMP v2 traps and possibly both, verify the
correct traps are in use with clients that support them.
3. For each specified destination IP, click Add to add the destination to the list of locations.
4. Select the checkbox for the destination IP address you wish to delete from the list and click the Delete
button.
5. Click the Refresh button to update the data displayed within the screen to the latest values.
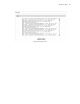
4.2.3 SNMP RF Trap Thresholds
The CB3000 Client Bridge allows settings of SNMP RF threshold levels on reaching which the traps are fired.
To configure the SNMP RF Trap Thresholds:
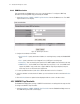
1. Select Management > SNMP > SNMP RF Trap Thresholds from the CB3000 Client Bridge menu tree.
The SNMP RF Trap Thresholds screen displays.